Showing posts with label birthday. Show all posts

August 23, 2013

Get Your Free On!

Happy Friday! 

How would you like a gloriously free printable (for personal use) that can be used for Project Life, scrapbooking layouts, cards, gifts or whatever other crafty goodness you can dream up?

Today marks the debut of Winnie & Walter to the world even if it is a tiny debut!  Winnie & Walter will be a small online boutique offering products designed by my talented friend Julie Mogford and I.  We are offering up a free printable (for personal use) on our blogs along with a little inspiration on how we used it.  This is to be the first of many printables in the future.

We have a whole lot of goodness coming soon so to keep in the loop about Winnie & Walter, please follow this blog and/or Julie's blog!

Now on to the free Live Laugh Love printable:


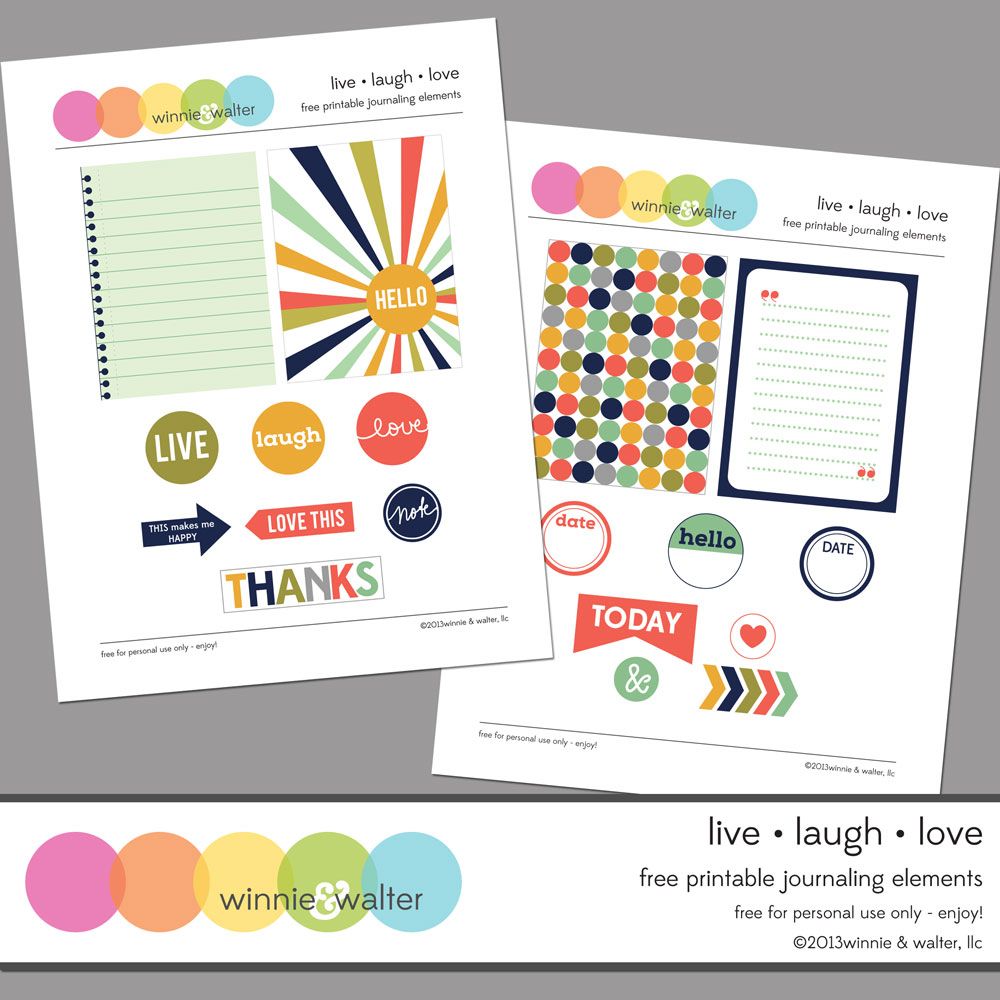
Like us on Facebook to receive the Live Laugh Love printable for FREE (personal use only)!

Tip: If you wish to adjust the colors of the printables I recommend using Photoshop or Photoshop Elements.  In Photoshop Elements under Enhance pick Adjust Color and then Adjust Hue/Saturation.  You can use the bars to adjust the hue, saturation and lightness as you desire.  For more information you can check out this simple tutorial: http://www.twopeasinabucket.com/cg_display.asp?g=4&seed_id=22398

What to see what I created with the Live Laugh Love printable?   Here are few cards for your viewing pleasure:
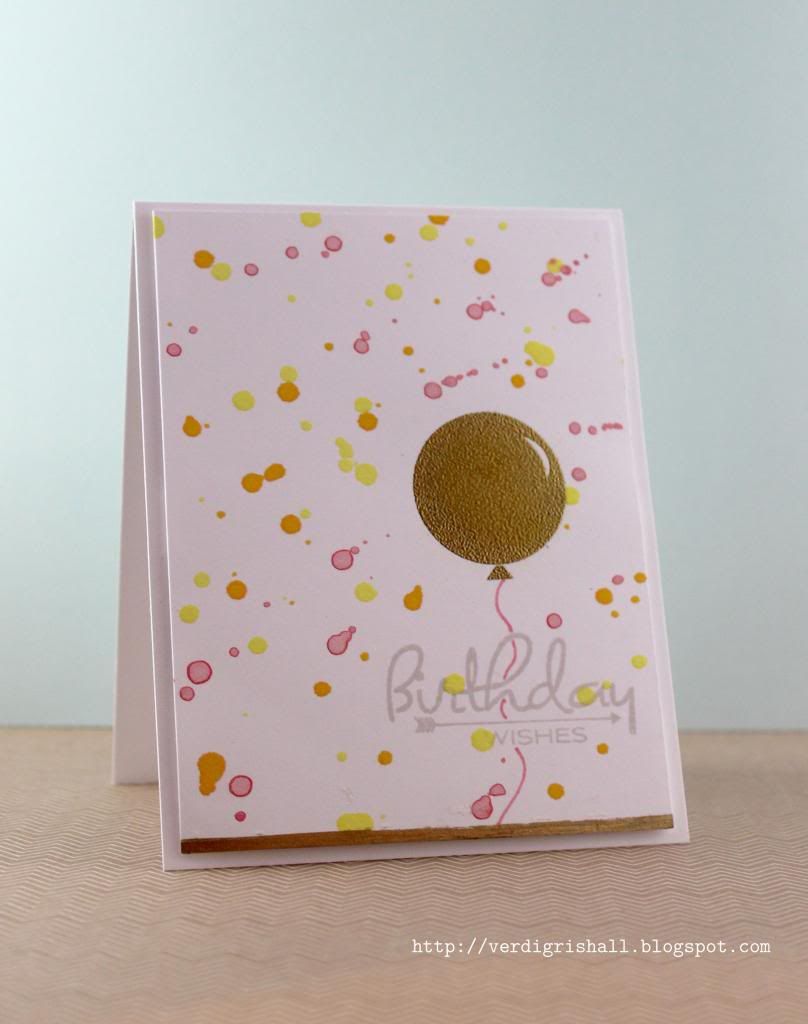
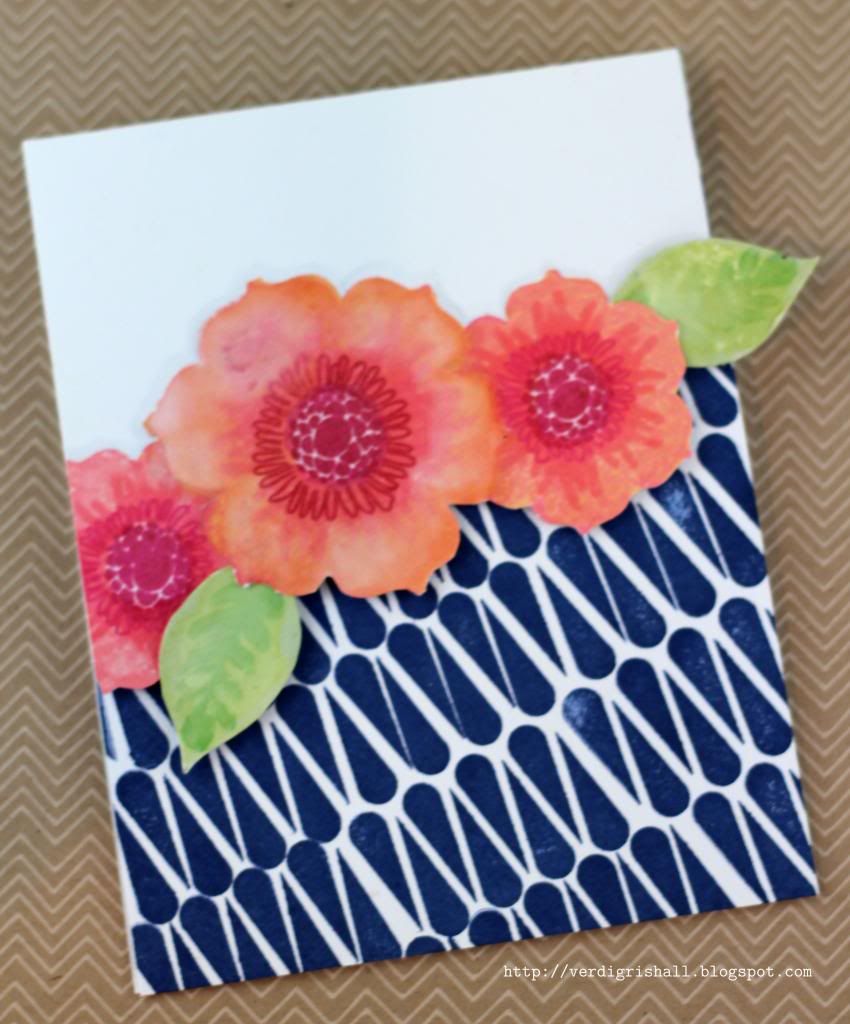
Card No. 1


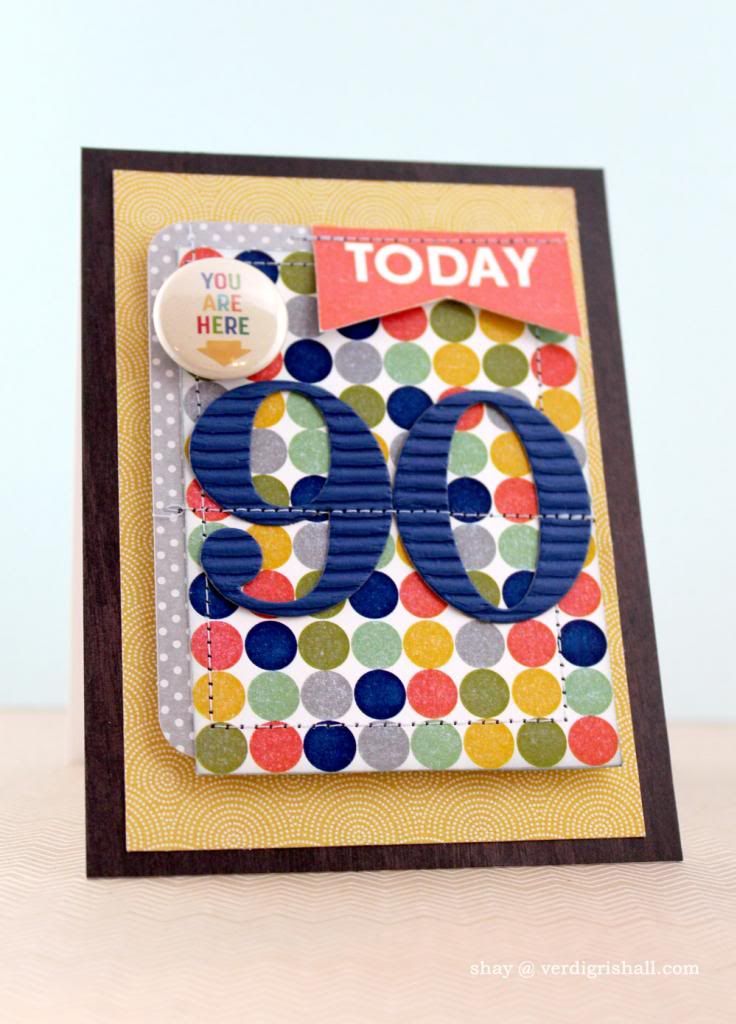
Today is actually my grandfather's 90th birthday.  For the occasion I made this card to celebrate such a momentous occasion.  I used the dot journaling card and today banner from the Live Laugh Love printable with the Spencer's Card Kit, grey polka dot journaling card from the Clementine Core Kit and a 4x6 woodgrain journaling card by Studio Calico along with number dies from Papertrey Ink.  I pulled out the sewing machine and went to town.  The last element was a tin pin from October Afternoon.
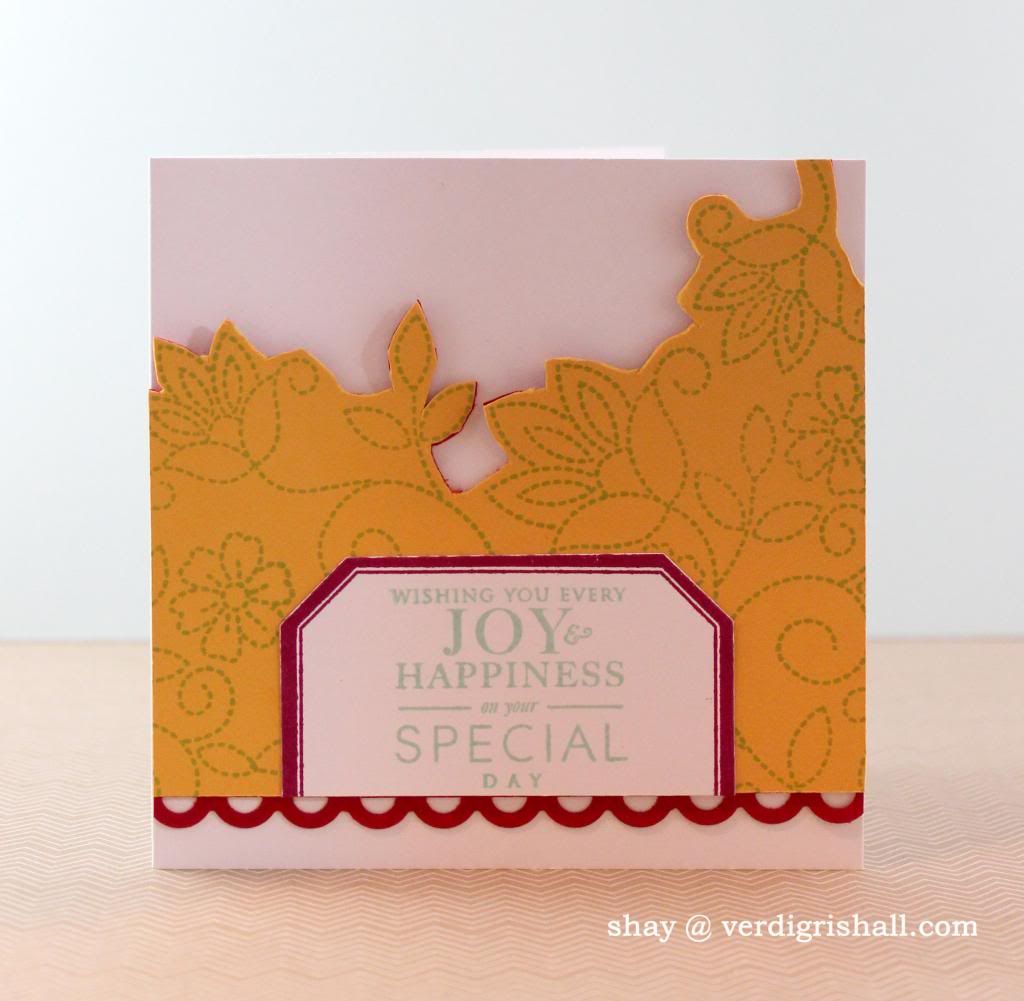
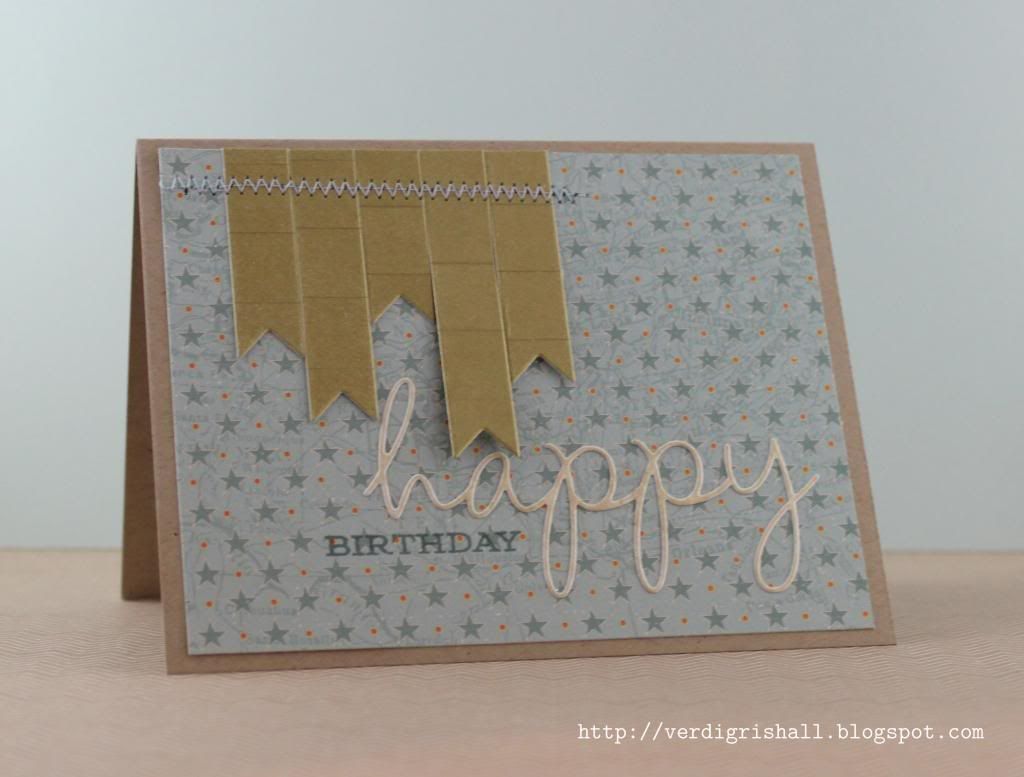
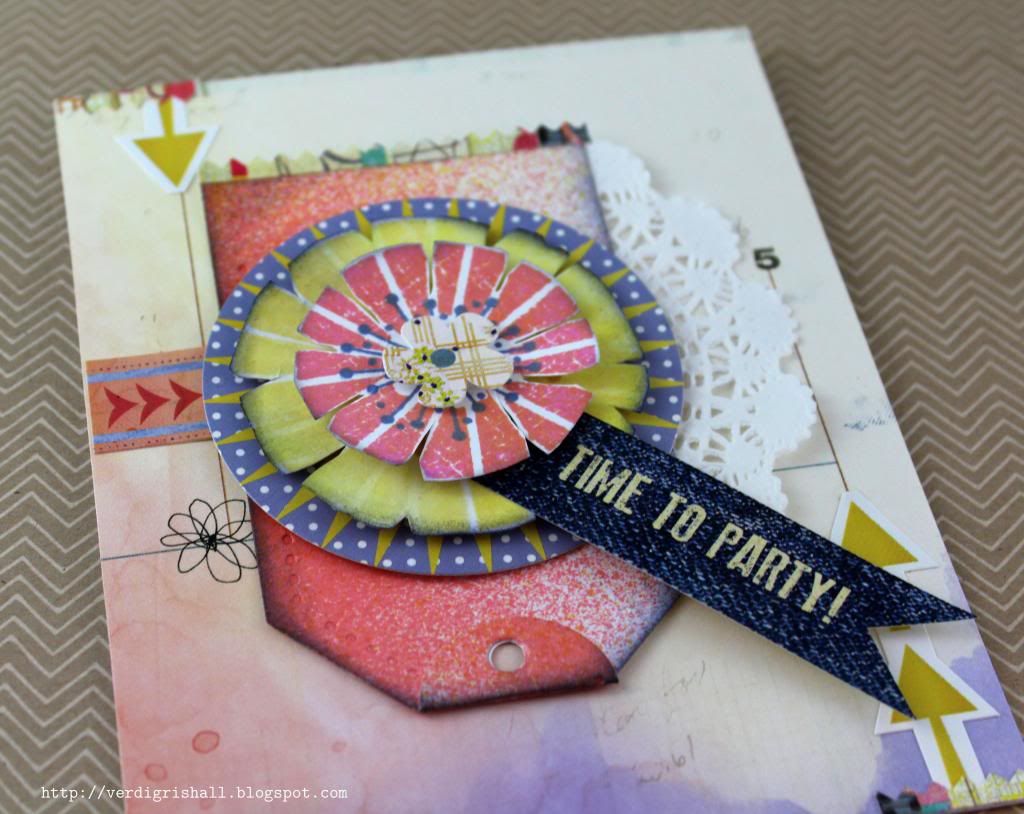
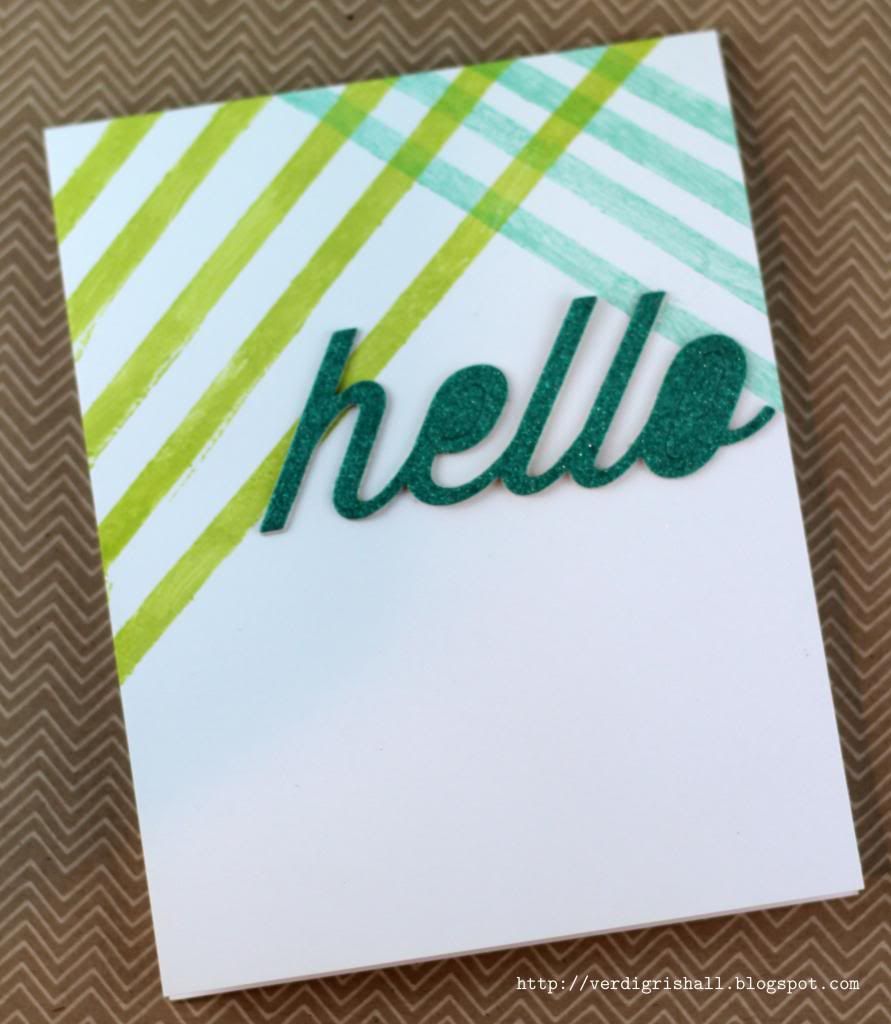
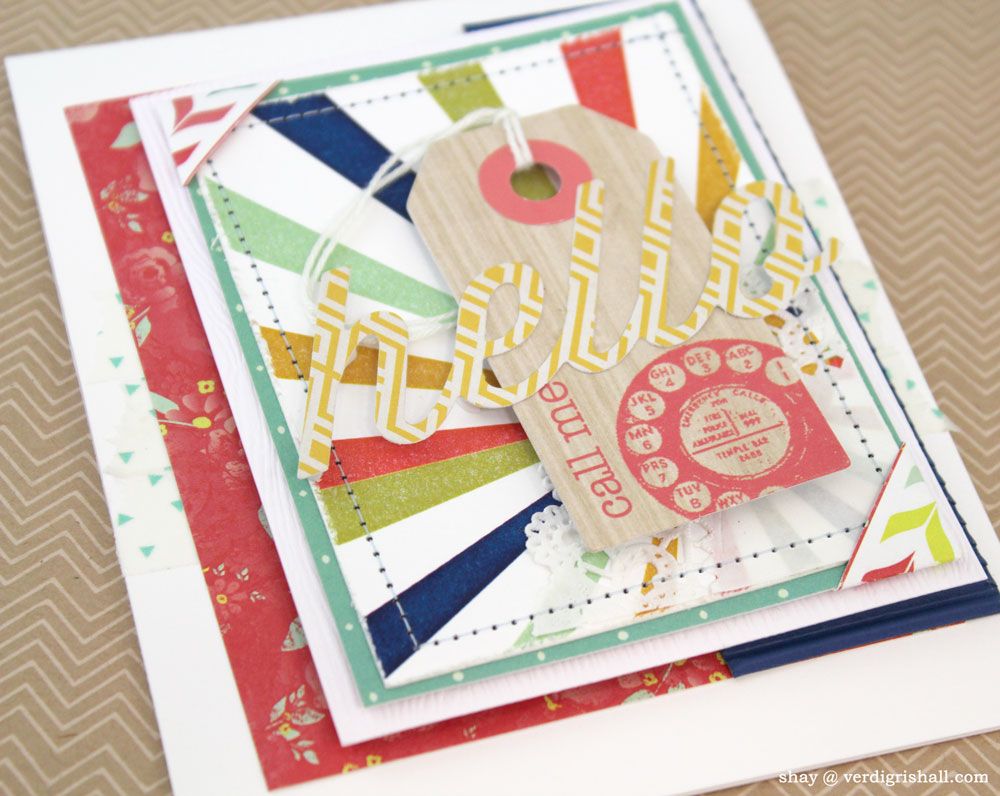

Card No. 2


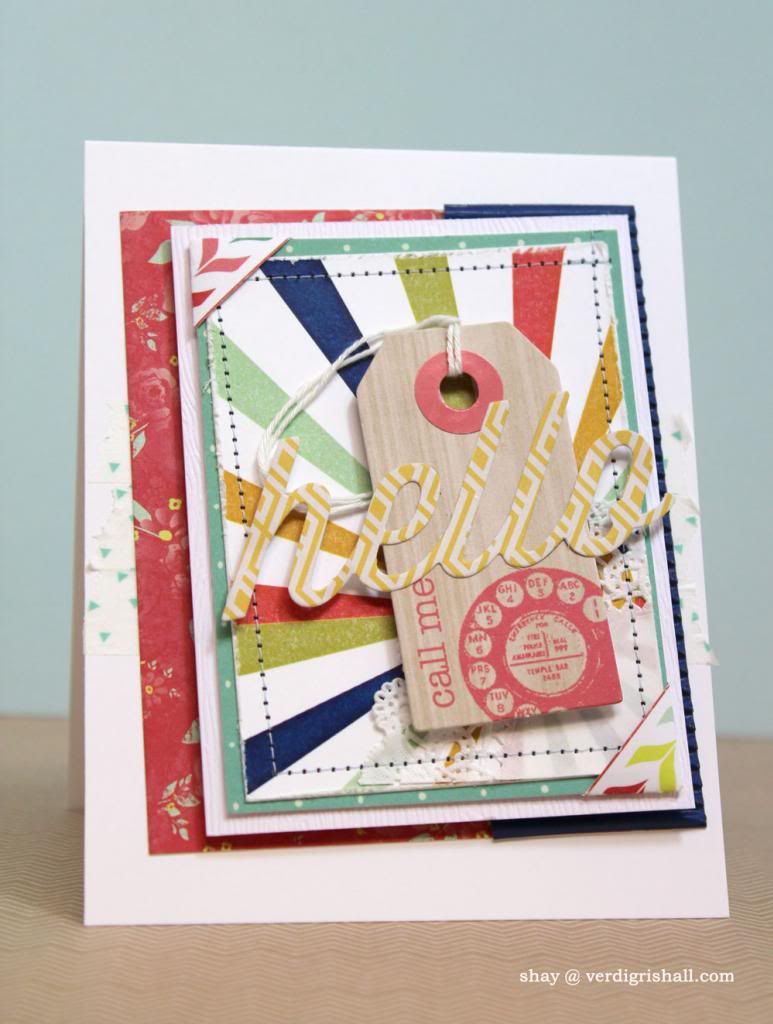
This card features the burst journaling card from Live Laugh Love.  It is a mix of things from Studio Calico (like the tag from Spencer's Card Kit and the journaling card under the burst journaling card) along with patterned paper from the 6x6 paper pad from the brand new Finnley collection by Glitz Design.  I found this collection really fun to play with along with the printables.  I also used the happy die from Papertrey Ink which I cut from the Soho Garden 6x6 paper pad.
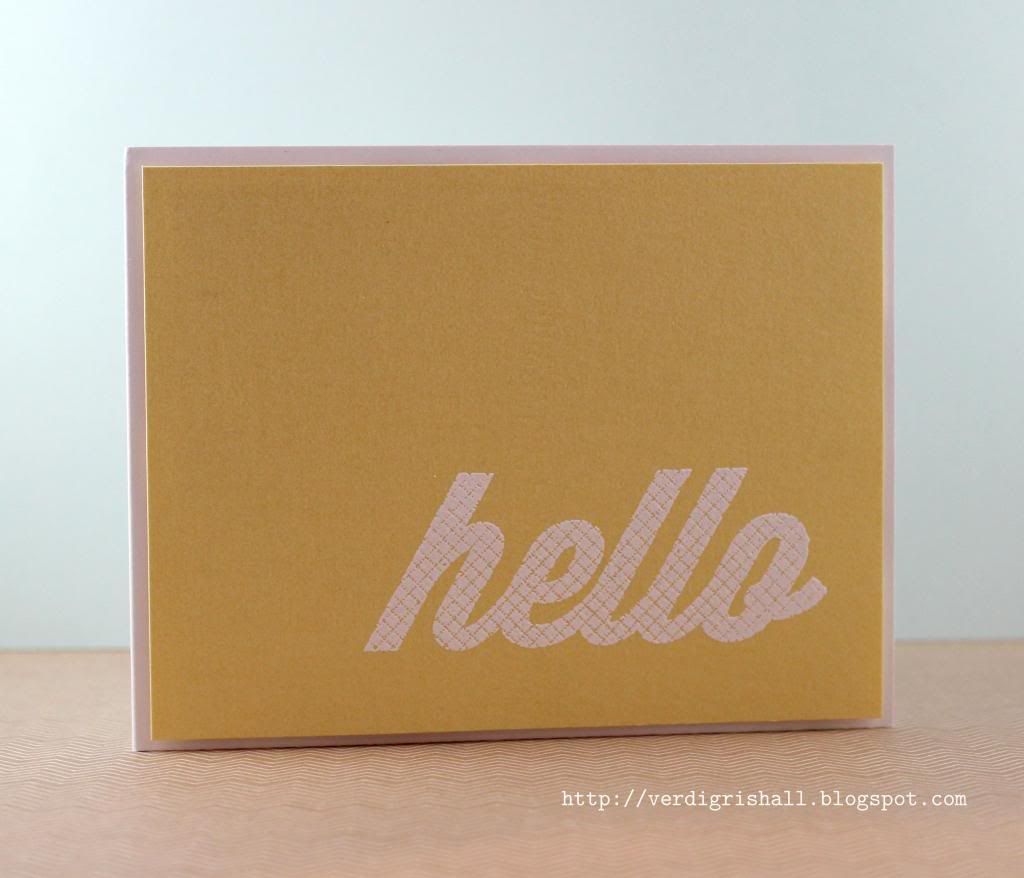
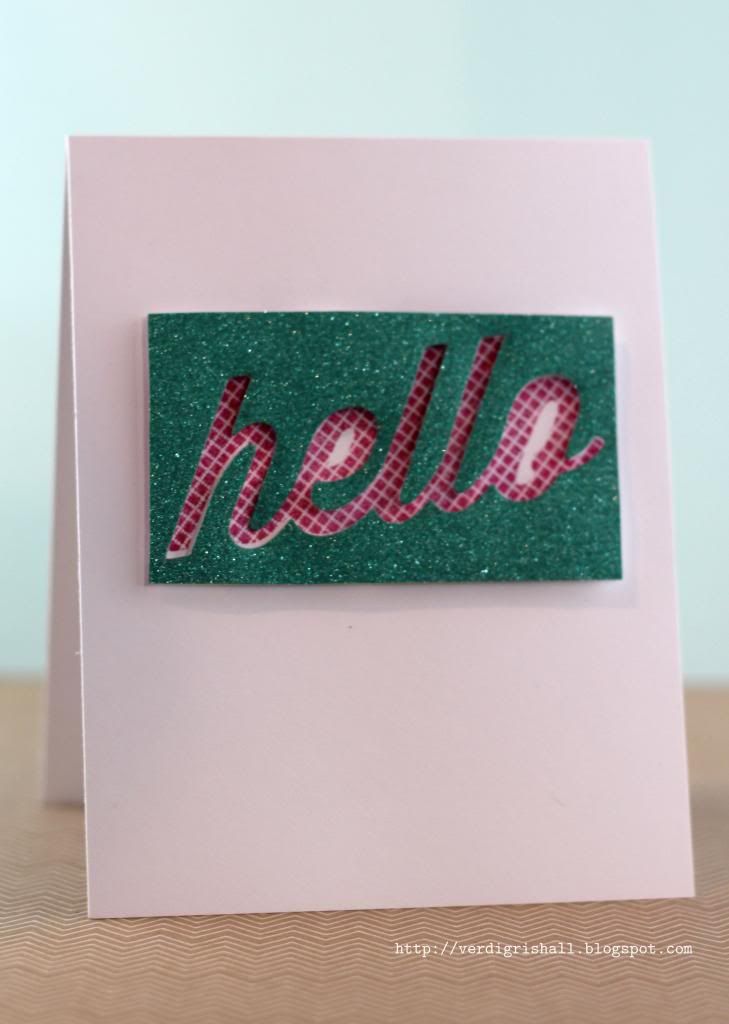
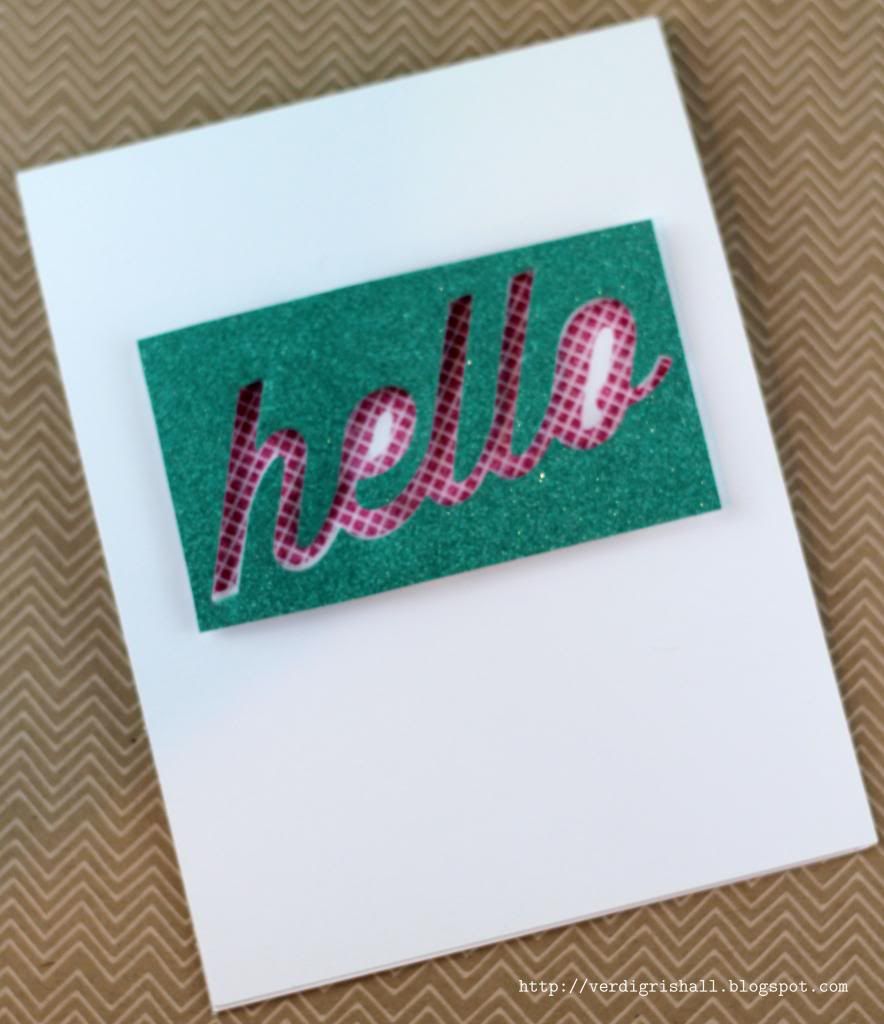
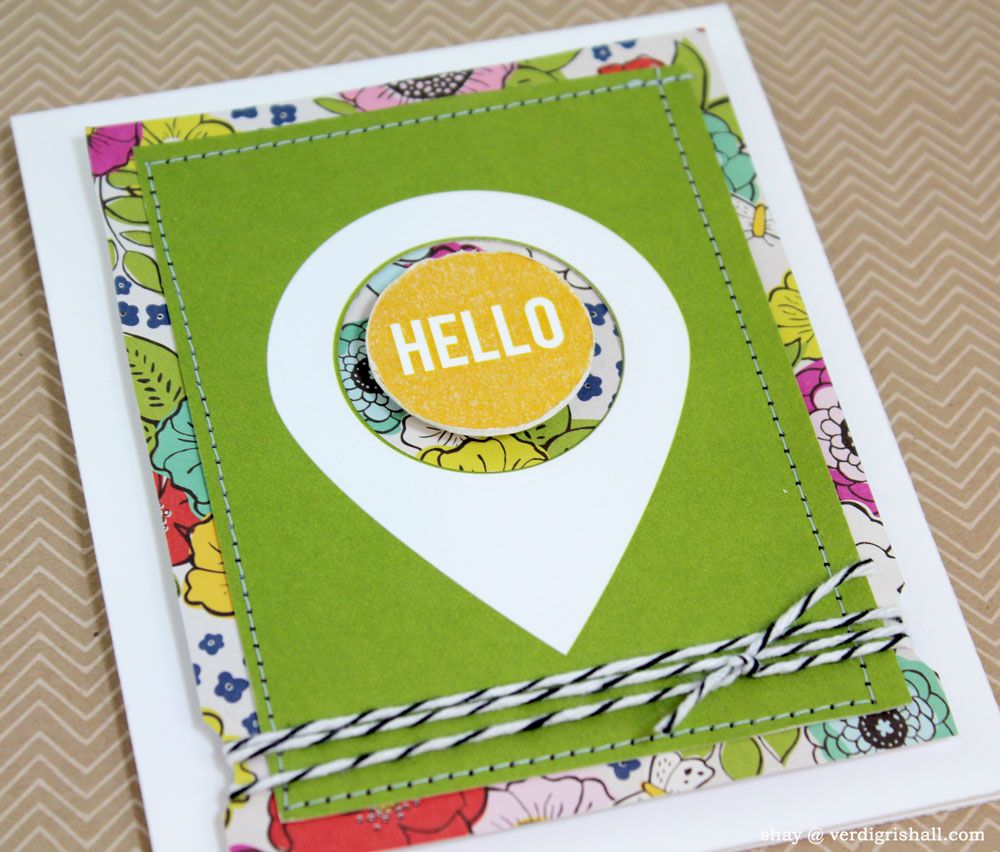

Card No. 3


This card highlights the hello circle which I cut from the burst journaling card of the Live Laugh Love printable from Card No. 2 (I oh so cleverly covered up that section so you can't tell there is a hole where the hello circle should be).  I added it to a geotag journaling card from Studio Calico and a fun and funky piece of patterned paper from the Soho Garden 6x6 paper pad.  I notched the panel with a circle punch and added some ever useful black and white twine.
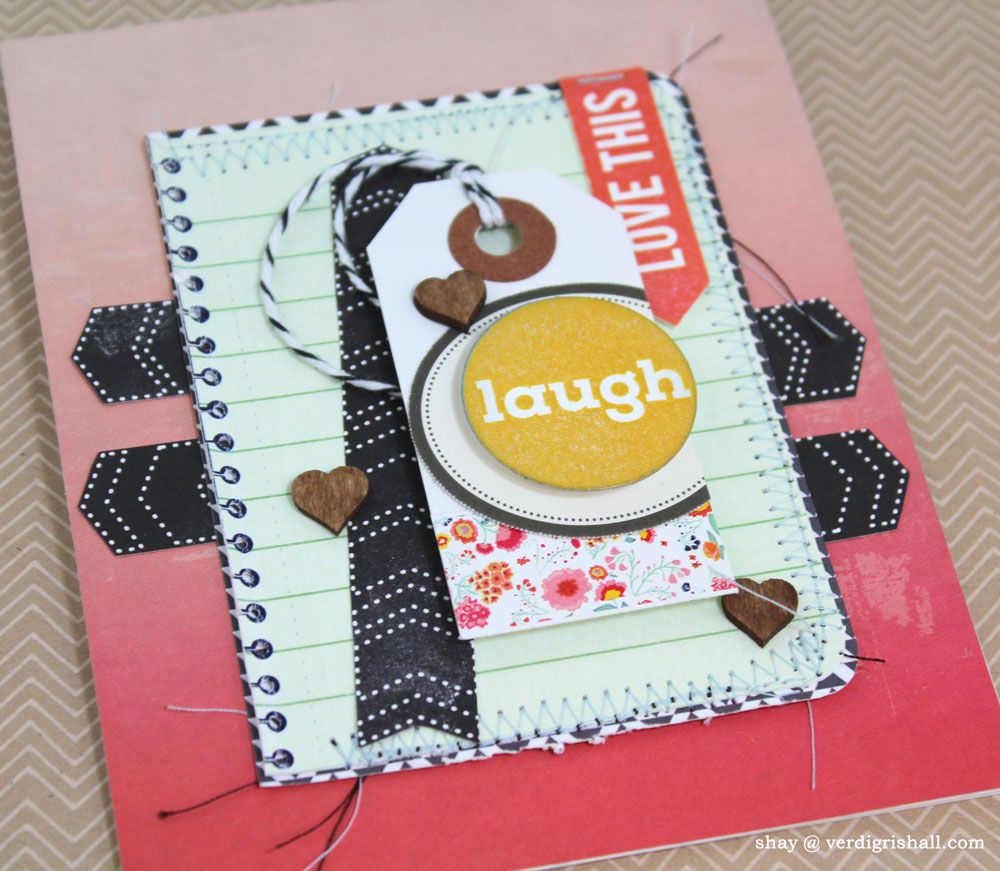

Card No. 4


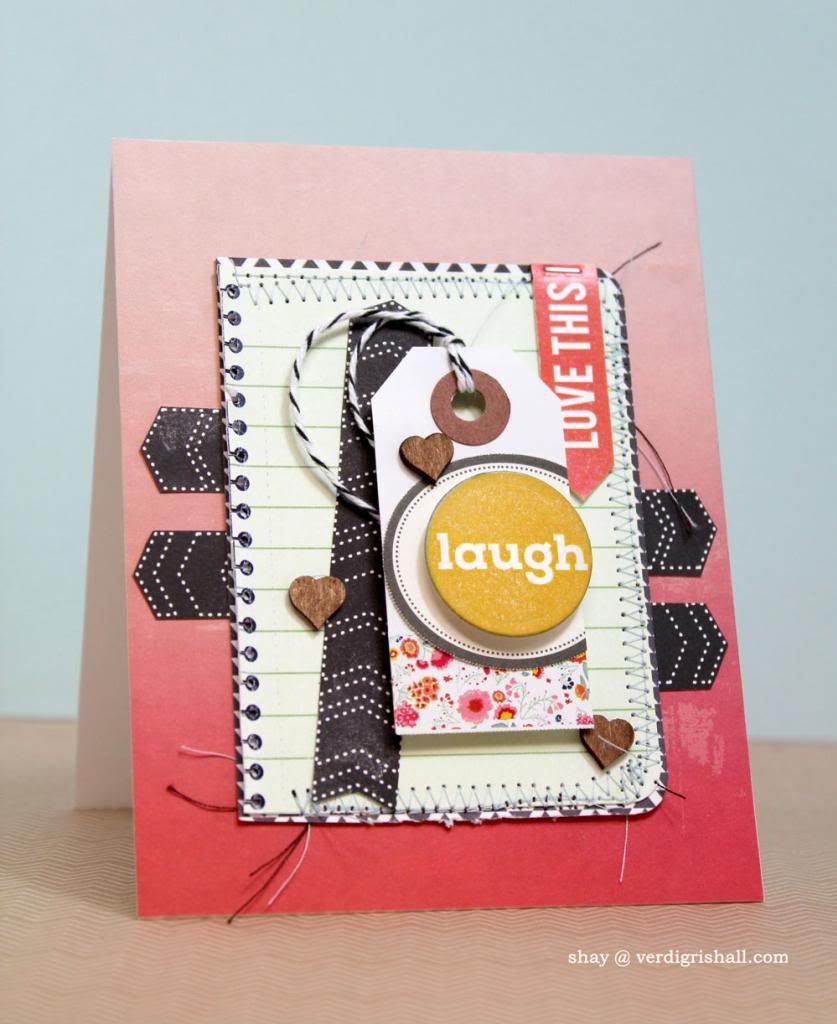
The notebook journaling card was the beginning piece of this card (I punched a hole through each of the navy circles and cut along the lines to give the notebook edge a bit more interest) which I built upon using other bits from the Live Laugh Love printable along with a journaling card from Studio Calico I cut up into arrows.  I added a sticker from Dear Lizzy's Lucky Charm Accent & Phrase Sticker onto the tag along with a tag from Anna Griffin under the laugh printable.  The patterned paper is again from the Finnley 6x6 paper pad.  The last touch were wood veneer hearts by Studio Calico.


Card No. 5


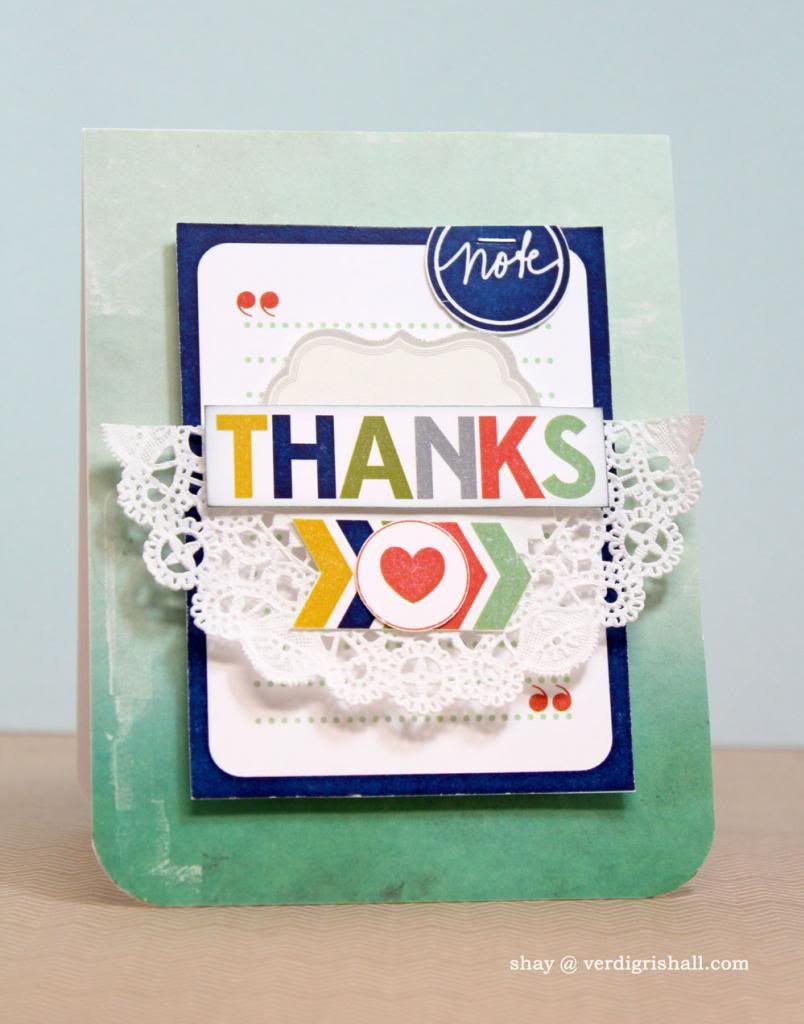
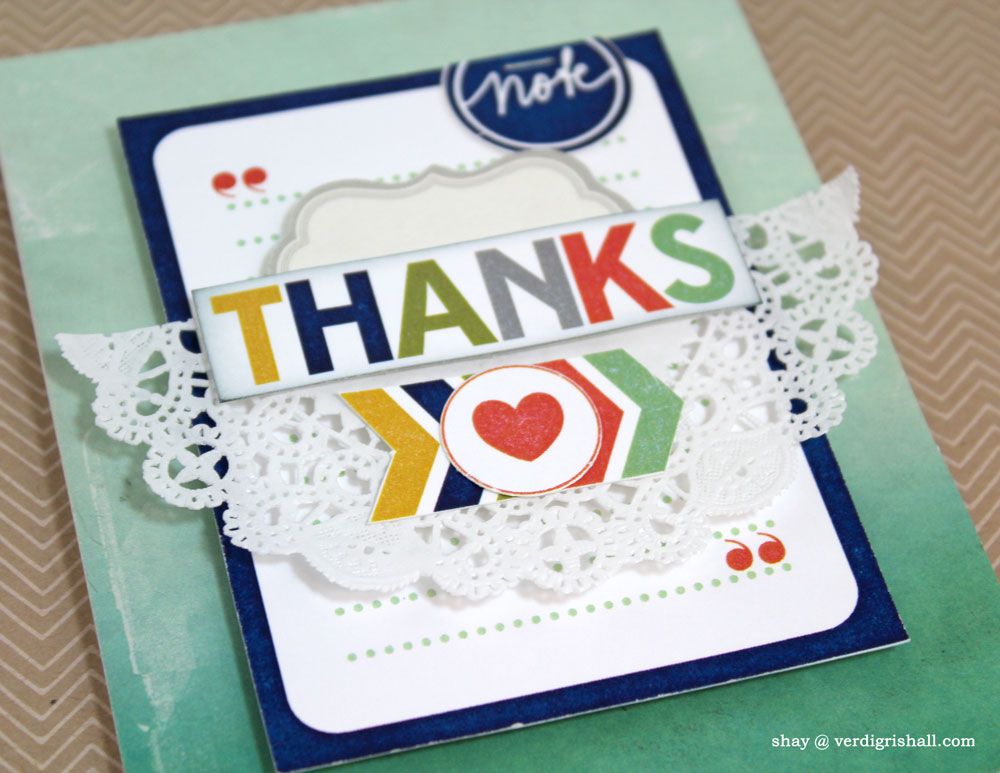
I tried to put quite a few of the elements from the Live Laugh Love printable on this one.  The only elements not from the printable are the grey label from Anna Griffin, doily and the ombre patterned paper also from the Finnley 6x6 paper pad. 


There you have my offerings to inspire you with the new and free Live Laugh Love printable.   Make sure to download it and head on over to Julie's blog to see what she has done with the Live Laugh Love printable. 

We would be over the moon to see how you used them so feel free to comment with a link!

Happy creating,
Shay.

Supplies:
live laugh love printable, Winnie & Walter
Spencer's Card Kit, Studio Calico
Cardstock: solar white, Neenah White; white woodgrain, Studio Calico; corrugated navy, stash
Patterned paper: Finnley 6x6 paper pad, Glitz Design; Soho Garden 6x6 paper pad, American Crafts
Dies: By the Numbers Die Collection and Wonderful Words: Hello die, Papertrey Ink; circle nestabilities, Spellbinders
Other: Cuttlebug, Provo Craft; journaling card from Clementine Project Life Core Kit, Becky Higgins; journaling cards, Studio Calico; sewing machine, Brother; tin pin from Boarding Pass collection, October Afternoon; accent & phrase stickers from Lucky Charm collection, Dear Lizzy/American Crafts; doily, Studio Calico; heart wood veneer, Studio Calico; labels, Anna Griffin; tiny attacher, Tim Holtz; white tag, Studio Calico; washi tape; black and white baker's twine, Whisker Graphics; 3/4" and 1" circle punches, Stampin' Up; Crop-A-Dile Chorner Chomper, We R Memory Keepers; dimensional adhesive

July 25, 2013

Papertrey Ink July 2013 Blog Hop | Fruits of Summer Color Inspiration


Welcome my talented friends! 

It's the 25th of the month which means another Papertrey Ink Blog Hop!  Today's is all about the juicy, bold colors of summer.  For more information check out Nichole Heady's blog post HERE.

With a healthy dose of bright white, I attempted four of the color schemes.  I probably should have gone with saturated flowers, but for some reason I did what I did.
   
Card No. 1


Card No. 2


Card No. 3


Card No. 4


I hope you enjoyed seeing what I made half as much as I will love your summery creations.  It was a delight to have you visit.

Happy creating,
Shay.

Supplies:
Stamps: Mehndi Medallion, Bountiful Banners, Irresistibly Ikat, Square Prints, Postmarks, Happy Trails, Stitches & Swirls, Label Basics and Half & Half, Papertrey Ink
Ink: raspberry fizz, harvest gold, limeade ice, soft stone and aqua mist, Papertrey Ink; bubble gum, butter bar, green hills, orange soda, raspberry jam and soft cantaloupe, Hero Arts Shadow Ink; VersaMark, Tsukineko
Cardstock: stamper's white select, raspberry fizz, pure poppy and summer sunrise, Papertrey Ink
Dies: Fillable Frames #1 die and Angled Labels Die Collection, Papertrey Ink
Other: opaque white embossing powder, JudiKins; heat embossing gun; Cuttlebug, Provo Craft; sewing machine, Brother; signo white gel pen, uni-ball, sunflower glitter tape, American Crafts; apron lace border punch, Fiskars; dimensional foam adhesive

June 25, 2013

Papertrey Ink's June 2013 Blog Hop Challenge | Touch of Gold


Welcome you oh-so-talented Papertrey Ink enthusiasts!  First, I have to say you rock.  No, I am not just saying it.  Every single one of you are a treasure!  Not only do you create gorgeous projects, but you also take the time to visit and leave sweet comments.  Thank you.  

I loved the challenge this month for Papertrey Ink's June 2013 Blog Hop:


Here are my takes on the challenge:

Card No. 1 | Embossing Powder


Card No. 2 | Gold Leafing Pen


Card No. 3 | Shimmer Cardstock


Card No. 4 | Washi


Card No. 5 | Glitter Tape


That's it from me.  I know I will be dazzled by what everyone else makes this round...I tell you I can't even imagine what marvels I will see!  Thank you so much for taking the time to visit.

Happy creating,
Shay.

Supplies:
Stamps: birthday style, mini blooms, wonderful words: hello, happiness in bloom and bountiful banners, Papertrey Ink
Ink: VersaMark, Tsukineko; soft stone and ocean tides, Papertrey Ink; evergreen bough and antique linen, Tim Holtz Distress Ink by Ranger; malted milk, Jenni Bowlin for Ranger; pale tomato, Hero Arts Shadow Ink
Cardstock: stamper's select white, kraft and gold shimmer, Papertrey Ink
Patterned Paper: road trip, Papertrey Ink
Other: headline alphabet die, double-ended banners die, wonderful words die collection, simply jane die collection, bountiful banners die, Papertrey Ink; Cuttlebug, Provo Craft; detail metallic gold and opaque white embossing powders, JudiKins; heat embossing gun; buttercup and sherbet Mister Huey's Color Mists, Studio Calico; pink balloon sprinklers, October Afternoon; gold washi; sewing machine, Brother; brown sugar glitter tape, American Crafts; bubblegum memory marker, American Crafts; gold leafing pen, Elmer's; Inkssentials ink blending tool, Ranger; doily; dimensional adhesive

June 21, 2013

Dear Mama Elephant

Dear Mama Elephant:

How do you do it?  How do you make such cleverly designed stamp sets that are nearly impossible not to covet?  My bank account does not thank you one bit.  I do though.  How could I not?  You have an adorable typewriter that works for men and women which I used to make a simple birthday card for my younger (don't ask by how much) cousin who plans on becoming a writer.  Perfect?  Yes, indeed Type It was.  You can even just stamp it right on your cardstock with the little separate sheet of paper without losing one iota of its beauty.  I also love the little typed sentiments...happy b-day. and to you. are just right.   Let us not forget the ever useful, Trifecta because I certainly have not!  I reach for that baby when I want some filler without it being fussy and still trendy.

Any success of my card I contribute to your designs:


I am looking forward to inking up more of your stamps and adding to my growing collection (again angering my bank account).  Should you like to give me special sneaks of upcoming releases for a very biased reaction, don't hesitate to ask.  I am on it!

A fan,
Shay.

Supplies:
Stamps: Type It and Trifecetta, Mama Elephant
Ink: weather vane, Jenni Bowlin for Ranger; raspberry fizz, Papertrey Ink
Cardstock: white, Georgia Pacific; raspberry fizz, Papertrey Ink
Patterned paper: Soleil 6x6 paper pad, Basic Grey
Other: sequins, Studio Calico; pearls, The Paper Studio; doily

June 19, 2013

Man Oh Man Monday No. 15 | Birthday Card with Layers

Hello there!  Man Oh Man Monday comes to you a smidgen late this week...only 2 days.  Geez.  I won't go into detail, but we lost one of our beloved dogs.  Now that I am able to see through the trail of tears and have stopped wailing (slight exaggeration for dramatic effect), I wanted to share a birthday card I made back in the fall of last year for an uncle of mine.


Don't ask me too many questions on what I did and what I used because I am sort of fuzzy on both.  I do know I was going through a phase of using layers of die cuts and patterns.  The journaling cards are from Studio Calico as is most of the stamps.  I think the die cuts come from My Mind's Eye and possibly Studio Calico too.


The inside (I can't recall where the happy stamp comes from):


Note to self: when using a strip with stars actually use a strip with full stars.

That's it from me for the moment.  Enjoy your day!

Happy creating,
Shay.

Supplies:
Stamps: celebrate from Twisty Slide Add-On Kit and chevron arrow from Couple's Skate Add-On KitStudio Calico; date roller stamp, American Crafts; birthday wishes from Central High Card Kit, Lawn Fawn for Studio Calico
Ink: brushed corduroy and spiced marmalade, Tim Holtz Distress Ink by Ranger
Cardstock: white, Georgia Pacific 
Patterned Paper: No Limits 6x6 paper pad, Heidi Swapp
Other: die cuts, My Mind's Eye and Studio Calico; tiny attacher, Tim Holtz; Inkssentials ink blending tool, Ranger; Crop-A-Dile Corner Chomper, We R Memory Keepers

June 8, 2013

Dear Sassafras

Dear sassafras aka Tim and Beck:

How I love your unique designs full of vintage touches, quirkiness, humor and flamboyant color combinations.  I find your products beautiful, intriguing and fun to use (I don't like to play favorites, but Sunshine Broadcast is one of my all time most beloved collections *ever*).  Case in point, Soleil which you designed in collaboration with Basic Grey last year (it happens to be on sale on Basic Grey's website right now).  I love it.  I love it even more today than I did when I first saw it displayed on my computed screen on Basic Grey's blog when they unveiled their Summer CHA 2012 collections.  And I love that I can mix in a stamped flower I had sitting on my work table from a previous doomed card to create something wholly new for my friend's birthday.  I decided to let myself be free as your designs foster creative adventures.

Here's my card which was delightful to make, although I am not sure it does your designs justice:


I plan to use Soleil all over the place and if I could I would wallpaper my room in your paper.  That isn't much of a hyperbole....as I type it I am considering whether I could wallpaper a wall of my room with your paper, but I hate to wallpaper...the preparation, the glue that doesn't quite work or works too well, the air bubbles, arms raised for long moments above the head and most of all the thought of in the future when I may want to/have to change things removing said wallpaper.  Will you be disappointed if I don't wallpaper my room with your paper?  Instead I may just place your papers in frames to hang on the wall.

You are awesome.  I hope to see many more of your designs in the future (please!!!!), but until then I will be (not at all like a crazy person) fervently admiring (soon in frames) and occasionally even using my vintage sassafras stash.

A fan,
Shay.

By the way, if you want a chance to win some free art products including stamps this weekend, check out my Paper Wings Productions' Design Team Blog Hop post HERE.

Supplies:
Stamp: Funky Florals (limited edition), Papertrey Ink
Ink: harvest gold, Papertrey Ink; bubble gum, orange soda, stone wash, Hero Arts Shadow Ink
Cardstock: white, Georgia Pacific; piece of cardstock previously sprayed with mists
Patterned paper: Soleil 6x6 paper pad, Basic Grey
Other: tag sale #3 die collection, Papertrey Ink; Cuttlebug, Provo Craft; element stickers and title stickers from Soleil collection, Basic Grey; doily; dimensional adhesive; Inkssentials ink blending tool, Ranger

April 30, 2013

Man Oh Man Monday No. 8 (on Tuesday)

Hello and happy Monday...er Tuesday rather!  Great to have you visit again for another installment of Man Oh Monday.  Coming up in June is one of the mega man holidays: Father's Day.  In honor of such an auspicious holiday I have decided to dedicate all of May's Man Oh Man Mondays to Father's Day.  I hope you will join me in celebrating the fathers and father figures in our lives in May!  

Now on to today's cards (again rated Easy Going):

I was inspired by Papertrey Ink's Make It Monday #114 video by Dawn McVey to create a couple of cards using the Star Gazer Additions stamp set.  I chose to use Distress Markers for my cards, but if you have reinkers, watercolors, Distress Stains or Distress Paints this could work just as well.  You could even use the ink pad themselves in much the way I used the markers.  I used the markers in two different ways for these cards.

**Of note is that after I colored these images I let them dry overnight under a heavy object to help them to dry flat, but I placed them under a plastic object which meant they still were not completely dry so they are "artistic" and not flat.  If you prefer flat put them under a heavy non-plastic object perhaps even wrapped in water absorbent paper towels.  Just sayin'.

Card No. 1 | Simple Version


I white heat embossed the large image from Star Gazer Additions.  I scribbled the markers onto the Inkssentials Non-Stick Craft Sheet and then liberally sprayed the ink with water and picked up the color with a paint brush and dropped big drops over the image and then used the straw to blow the color in different directions.  I also flicked (best adjective I can think of and you may want to put a tarp over cover your work surface to avoid drops of color being everywhere!) smaller drops of color over the image and cardstock.


I added the panel to a piece of pewter cardstock and added a sentiment strip using dimensional adhesive. 


Okay, I have to admit that the torn bottom of this card is purely accidental...an adhesive mishap which I decided to just go with and sort of supports the whole tie-dyed Seattle circa 1992 grunge look,  I am sure tie-dying came about in much the same serendipitous way.

Card No. 2 | Flashy Version


I gold heat embossed the large image from Star Gazer Additions.  I used the markers to color in the image directly.  I then used the paint brush to drop water onto the image (remember that Distress products are reactive to water...cool stuff!) and used the straw to blow the water in different directions.

I added the sentiment strip which was bordered by some gold (the color is actually brown sugar which I often prefer to the real gold color) glitter tape and added some wood veneer stars for added embellishment (confession: the wood veneer stars were a clever ruse to cover the fact that the top star from the sentiment didn't quite fit on my white strip).


The card base was painted with some of the Distress Markers and water. 


MOMM Tips:
MOMM Tip No. 1: Mix It Up.  Use the same products for different results.
MOMM Tip No. 2: Go For It.  Add that dash of drama.  A little gold is appreciated.
 
That {finally} concludes this week's MOMM.

If you have any suggestions or questions regarding the upcoming focus on Father's Day, just leave me a comment!  See you next week for our first MOMM Father's Day special.

Happy creating,
Shay.

Supplies:
Stamps: Star Gazer Additions, Papertrey Ink
Ink: Versamark, Tsukineko; stone wash shadow ink, Hero Arts
Cardstock: stamper's select white, Papertrey Ink; pewter, Neenah Paper
Markers: tumbled glass, broken china, stormy sky, faded jeans, chipped sapphire, dusty concord and pine needles, Tim Holtz Distress Markers by Ranger
Other: opaque white and detail gold embossing powder, JudiKins; Inkssentials Non-Stick Craft Sheet, Ranger; stars wood veneer, Studio Calico; brown sugar glitter tape, American Crafts; drinking straw; paint brush; water; spray bottle; dimensional adhesive

April 25, 2013

Papertrey Ink's April 2013 Blog Hop: Tilted


Welcome, welcome, welcome!  A bit a redundant, but I think I made you feel welcome, right?  I am so happy to have you visit today for my take on April 2013 Papertrey Ink Blog Hop's theme:


I know that there will be amazing projects featured by you.  Here is what I cooked up:

Card No. 1


First up this handy dandy card using the new Handy Hardware set which is perfect for masculine birthdays, congratulations, encouragement, forgiveness, thank you and father's day.  The inspiration for this card came from the over-the-top-talented Betsy Veldman from this card HERE (see the second card down with the saw?  Yes, that's the one...see the resemblance?).  I stamped planks of wood using Background Basics: Woodgrain on kraft then cut them into 1/2 inch strips, inked the edges and installed them at an angle upon my card.  An even easier version of this card could be made using the Background Basics: Farm & Barn, but unfortunately I don't own that set yet.  Perhaps you do though?  It would be worth a try.  I could also see this done in a weathered wood color scheme.  I love you woodgrain...4ever.

Card No. 2


For my next card I went a different more colorful and feminine route.  I love flowers, but strangely I don't use them all that much.  I could not resist the new Happiness in Bloom set with it's bold and fun florals and then the teardrop border.  Even before I received this stamp set I had designed the card which is very similar in design to the bottom right hand card on the inspiration picture by the always inspirational Maile Belles.  I used Distress Inks with the stamp set to create my border of flowers.  I did a bit of a watercolor effect as Distress Ink fills in better and blends better when sprayed with water.  I also masked off the largest flower so it is in the foreground.  I filled in some of the areas with watered down ink and a paint brush.  For added dimension I used a gray Copic marker around the flowers.  I cut around the bottom of the flowers and added the leaves.  The background was stamped repeatedly in navy.  I have a big crush on navy at the moment.  With dimensional adhesive I adhered the flower section to the card base. 

Card No. 3


Then I did another card...clean, simple and graphic this go around.  Diagonal stripes stamped asymmetrically on the top of the card using Background Basics: Super Stripes and finished off with Wonderful Words: Hello die cut from both POW! glitter paper and from a coaster for dimension.  Hello indeed!

Card No. 4
  

I used the negative block from the POW! glitter paper for the focal point of my last card.  The word was cut out of the paper at an angle.  Behind the glitter paper I stamped the hello from the Wonderful Words: Hello mini stamp set in raspberry fizz.  I adhered the POW! glitter paper using dimensional adhesive and voila it is one dy-no-mite card.
That's it from me.  Thank you so very much for stopping by and I hope to you come visit again soon! 

Happy hopping,
Shay.
Supplies:
Inks: soft stone, dark chocolate, limeade ice, aqua mist and raspberry fizz, Papertrey Ink; charcoal and navy shadow ink, Hero Arts; wild honey, dried marigold, worn lipstick, picked raspberry, fired brick, shabby shutters and mowed lawn, Tim Holtz Distress Ink by Ranger
Cardstock: stamper's select white and kraft, Papertrey Ink
Specialty Paper: POW! glitter paper in jade, American Crafts
Die: Wonderful Word: Hello, Papertrey Ink
Other: coasters, Papertrey Ink; Cool Gray No. 00 (C00) marker, Copic; ink blending tool and foam, Inkssentials by Ranger; Cuttlebug, Provo Craft


LinkWithin

Related Posts with Thumbnails