Showing posts with label mixed media. Show all posts

October 4, 2013

Paper Wings Productions' October Design Team Blog Hop


WELCOME to Paper Wing Productions' October Design Team Blog Hop and Giveaway! If you've arrived here from Norma's blog, then you're in the right place.  If you’re just stopping by for a visit, please CLICK HERE to start from the beginning.

This month we’re having some wicked fun but don't be scarred because our creations will be a treat for your eyes!  Get comfy and prepare to shriek with delight!!  This month’s main prize is a gift certificate to the Paper Wings Production’s online store (you could pick up the new devilishly delightful Nesting Components Mixed Media Kit).


For a chance to win all you need to do is:
  • be a follower of the Paper Wings Productions' blog, The Aviary­
  • visit each of the participating designer's blogs and leave a comment
  • come back and leave us a comment telling us you completed the hop
To increase your chances of winning: like our Facebook page and/or invite your friends to the hop. Be sure to leave a separate comment for each of your additional entries.

The winner will be announced on Tuesday, October 8, 2013 on The Aviary­.

Ready to see what trick or treat I have in store for you?

You be the judge....


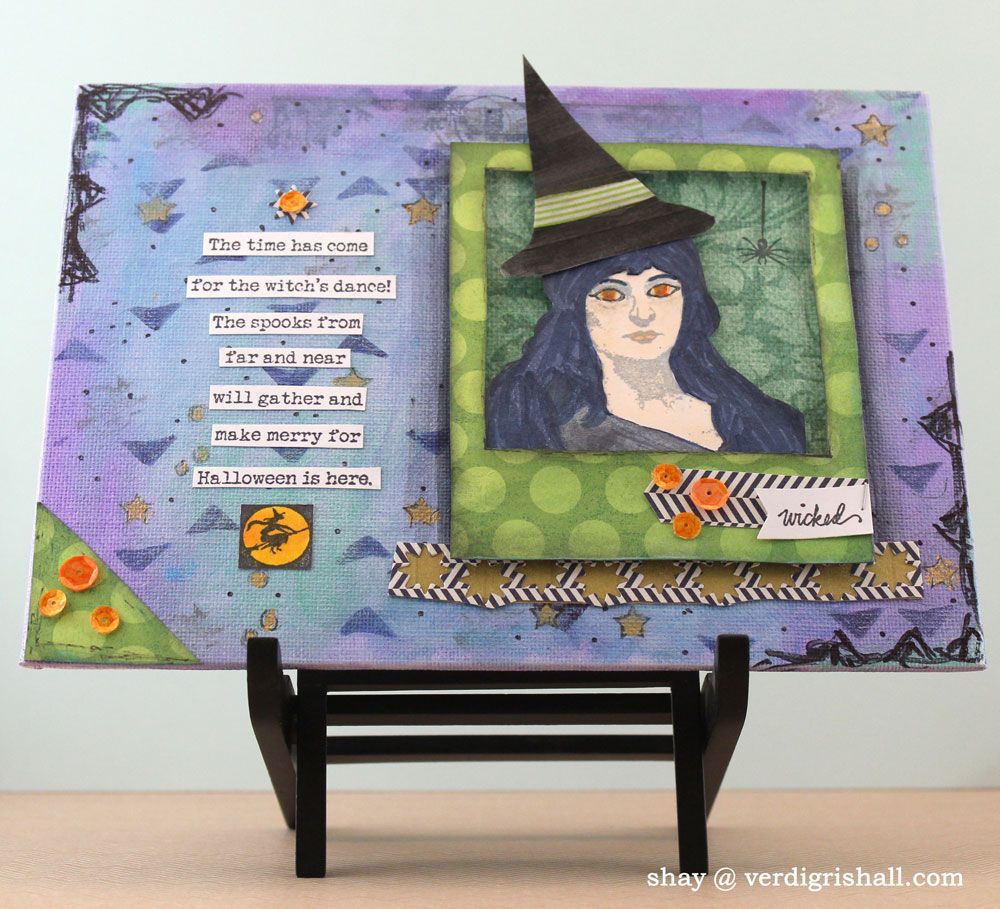
I chose to do a canvas panel again.  I love the flexibility and possibilities with one of these canvas panels plus they are a bargain when you buy them on sale at Michael's.  A bonus for stampers, the canvas panels are a firm surface that is easy to stamp upon.


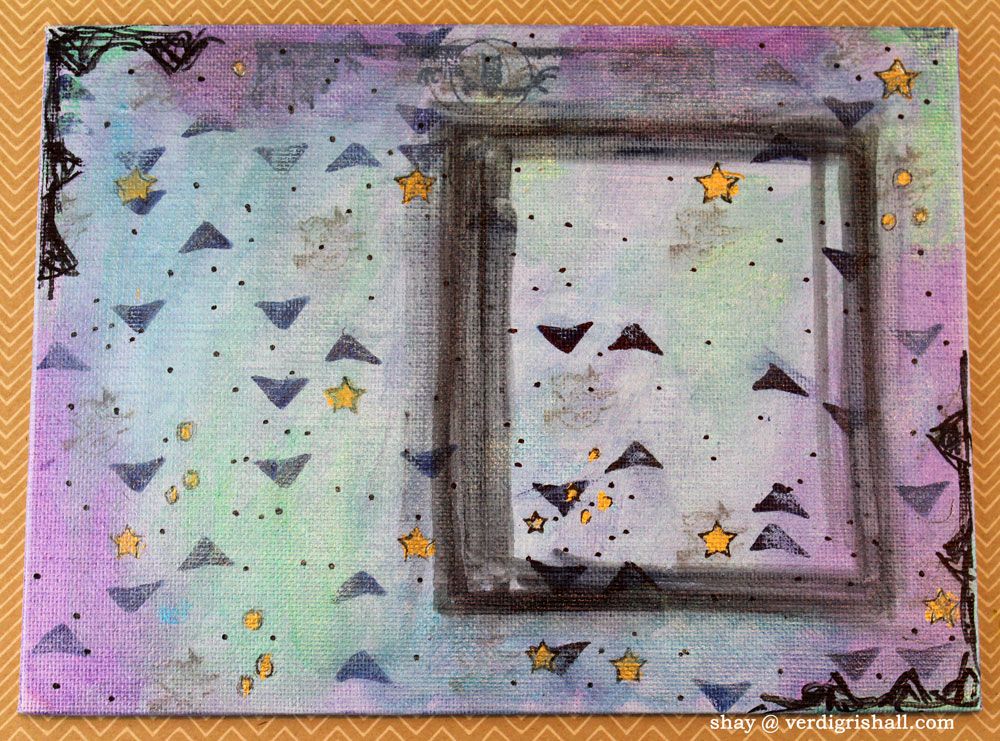
I started by scribbling on some metallic blue, green and purple Gelatos directly onto the panel and then spread the color with a wet brush.  Next I added some triangles using the Stamper's Big Brush pen and a mask randomly on the panel.  In grey ink I stamped the little witch from Witchy Halloween or Witchy Greeting randomly over the panel and dabbed off any excess ink for a faded and subtle look.  Using a gold metallic pen and a star mask I added some stars which I also outlined with a black pen.  I added some messy sketching with a Sharpie in two corners.  I also stamped the owl border from Halloween is Here on the top of the canvas in grey and then navy inks.  Where I planned to put on a focal point I drew a box to create a shadow.


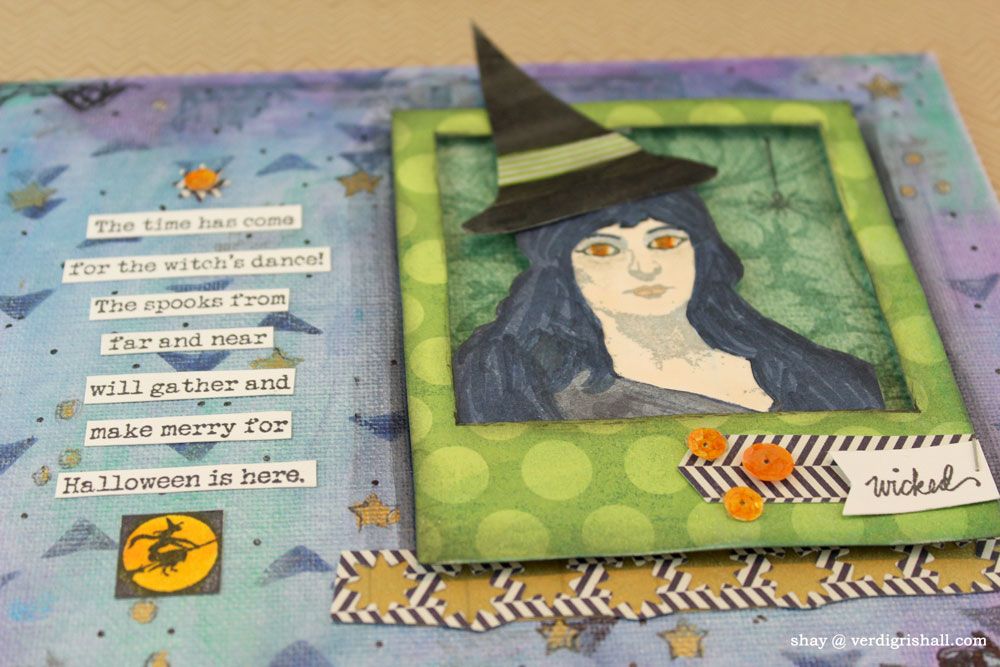
For my focal piece I began with one of my favorite ladies: Heather (to get Heather and all her friends pick up the Women Melange set) to create a witch.  I know, I know wicked witch is so cliché, but I honestly could not help myself!  I stamped Heather twice, once with navy ink and once with a light grey ink.  Using the navy inked image I colored in Heather's hair in dark blue (why shouldn't a witch have deep dark blue hair?  Just seemed right to me) and her dress.   On the light grey image I colored in Heather's skin and face making sure to make her more eerie and creepy by giving her outlined orange eyes.  I cut out Heather's face and neck from the navy image and placed the grey Heather under the navy one.  For a witch's hat I cut one out from cardstock, added a strip of green striped washi and painted it black to transform Heather into a proper witch.

I decided I wanted Wicked Witch Heather framed.  I traced a polaroid frame onto some green polka dot patterned paper, cut out and placed Heather inside using dimensional adhesive.  I backed Heather with some green damask patterned paper which I stamped with the cute little spider from Witchy Halloween or Halloween Friends in black ink.  To dress up the frame a little I added the little wicked (in case you were unsure of the wicked theme) from Witchy Halloween or Witchy Greeting, some patterned paper and sequins that I altered using a handy orange Copic (love my Copics!).

Under Heather I added a strip of patterned paper cut with a stars die with the negative space backed with gold washi.


I stamped the poem from Halloween is Here or Time Has Come onto white cardstock and then cut out each line and added them to the left of Heather.  Above the words I added a die cut star accented with a sequin.  Under the words is the witch square from Witchy Halloween or Witchy Greeting stamped in black ink and colored in with yellow and orange Copics.

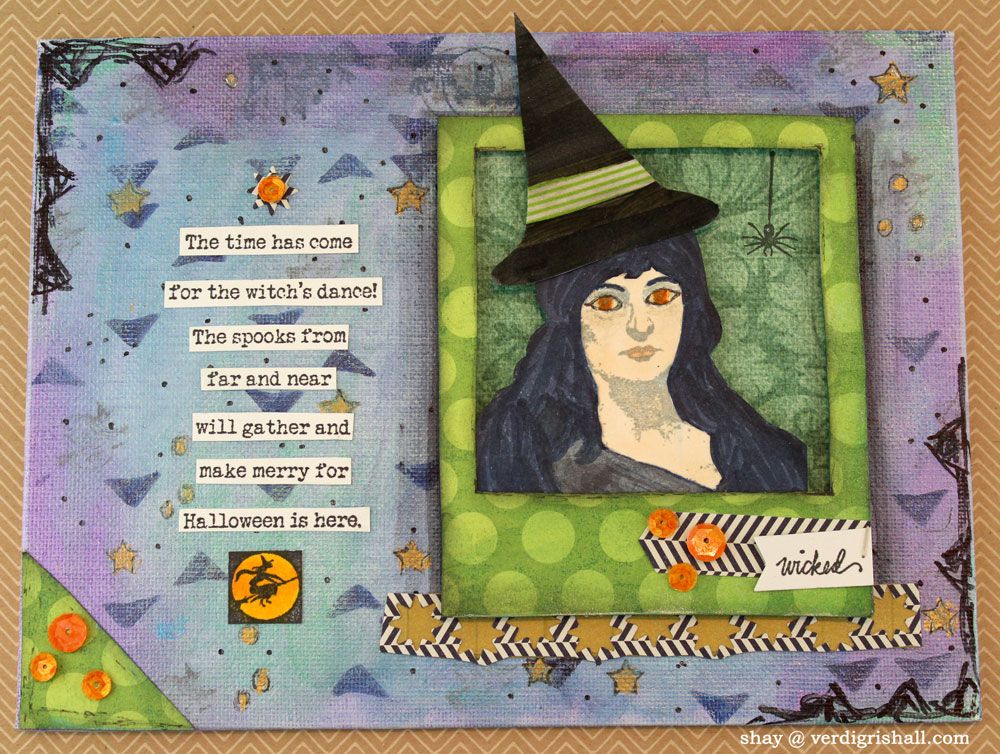
 Here is one last look at the finished panel:


If you haven't fallen asleep from reading my essay long description of what I did, I thank you for your strength and fortitude!  You also deserve a treat and I have just the thing for you: head on over to Amber's blog!

***Here is the complete line up just in case you get lost along the way***


Thank you so very much for sweeping by today and have a wickedly awesome day!

Happy creating,
Shay.

Supplies:

Stamps:


Ink: tuxedo black, Memento by Tsukineko; navy and charcoal mid-tone, Hero Arts Shadow Ink; weather vane, Jenni Bowlin for Ranger
Canvas: 6x8 canvas panel, Artist's Loft
Cardstock: white, Georgia-Pacific
Patterned Paper: "Oxford Lane" from kate & co. Collection 6x6 paper pad; Fly a Kite "Wish" Ribbon from Lime Twist Collection and Sweet Surprise from the Ooh La La Collection; My Mind's Eye
Die: Star Gazer Die Collection, Papertrey Ink
Other: Cuttlebug, Provo Craft; metallic grape, metallic blueberry and metallic mint Gelatos, Faber-Castell; cobalt blue PITT artist big brush pen, Faber-Castell; star pattern and triangles pattern Huey's Masks, Studio Calico; Pale Fruit Pink (E000), Pink Flamingo (E01), Lightening Yellow (Y18), Pumpkin Yellow (YR15), Agate (B99), Cool Gray No. 7 (C7) and clear (000) Spica,  Copic; black precision pen (05), American Crafts; white Signo, Uni-Ball; gold leafing pen, Elmer's; fine point permanent marker, Sharpie; foam dimensional adhesive; gold and green stripe washi; black acrylic paint, Delta Ceramcoat; small pearlized sequins, Inspire Lovely; coral sequins, Studio Calico; mini glue dots; Tiny Attacher, Tim Holtz

September 6, 2013

Paper Wings Productions' September Design Team Blog Hop


WELCOME to our Autumn themed Paper Wing Production's Design Team Blog Hop & Giveaway!  If you've arrived here from Norma's blog, then you're in the right place.  If you’re just stopping by for a visit, please CLICK HERE to start from the beginning.

This month we’re sharing gorgeous autumn themed projects full of warm rich colors.  So get comfortable and prepare to be inspired!!  This month’s main prize is a gift certificate to the new Paper Wings Productions’ online store.


For a chance to win, all you need to do is:

  • be a follower of the Paper Wings Productions blog, The Aviary
  • visit each of the participating designer's blogs and leave them some love. Then go back to The Aviary and leave a comment letting them you completed the hop. 
  • to increase your chances of winning, like the Paper Wings Productions' Facebook page and/or invite your friends to the hop. 
  • then just come back and let us know! Be sure to leave a separate comment for each of the additional entries. 

The winner will be announced on Tuesday, Sept 9th, 2013 on The Aviary.

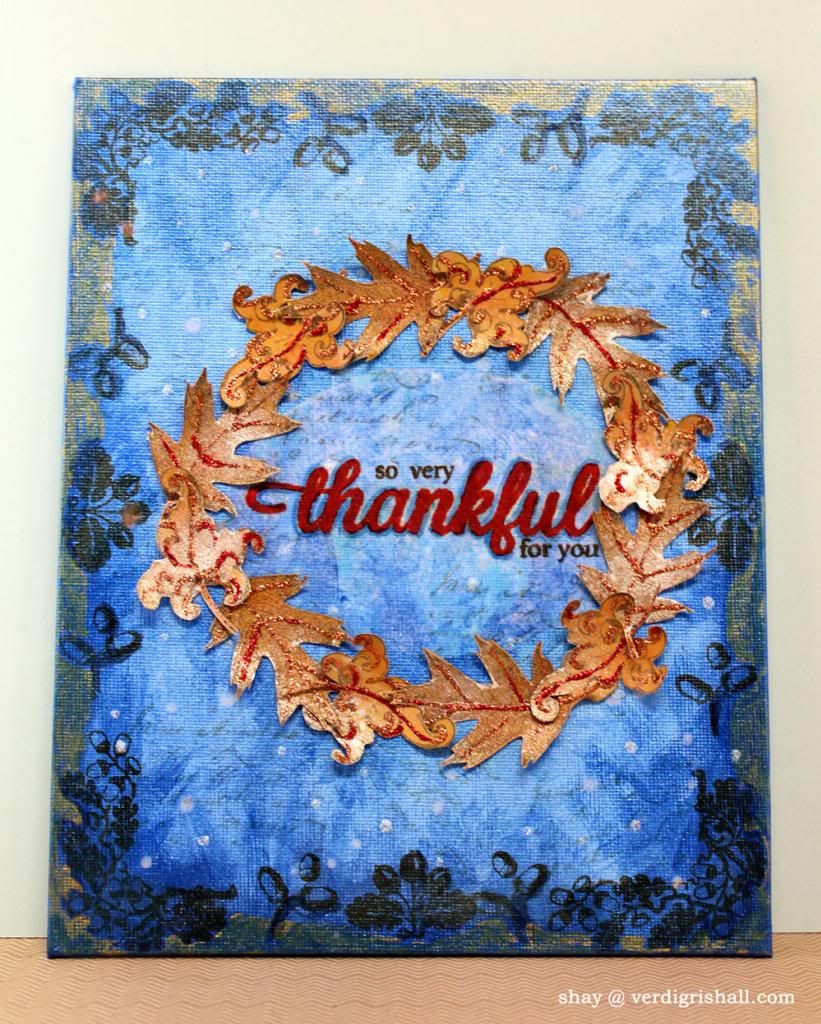
For my autumn inspired project, I wanted to use the gorgeous leaves found in Leaves or Leaf and Thanks is for Giving or Mini Thanks to create a wreath. 

 
First thing I traced a circle onto the canvas with a pencil.

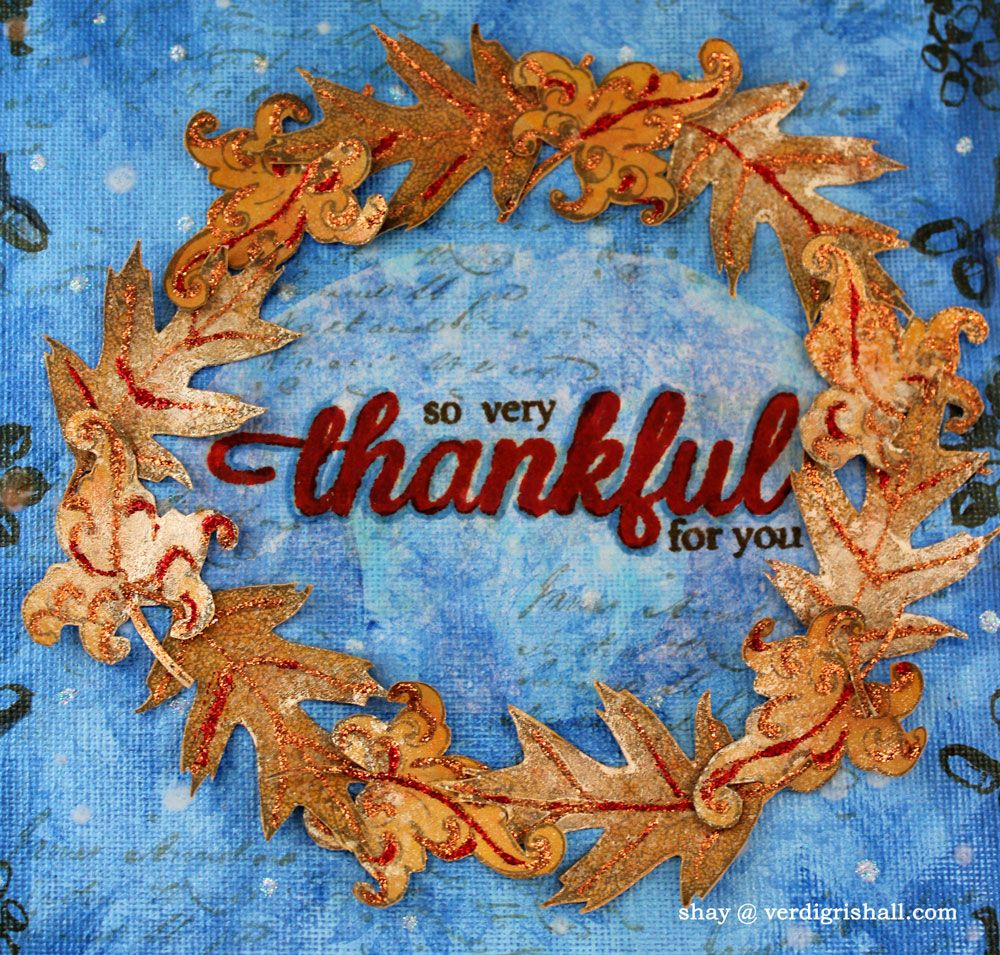
I stamped 6 of the single leaf from Leaves or Leaf and 6 of the flourish leaf from Thanks is for Giving or Mini Thanks with brown ink onto kraft cardstock.  I took out yellow and orange gelatos and colored in the leaves haphazardly and then used a brush and water to blend the colors.  After they had dried I cut out all the leaves.  I spritzed the leaves with shine mist.  Then I added details to all the leaves using copper and red Stickles.  I set all the leaves aside to dry overnight.

For the canvas panel I painted it with watered down metallic blue paints.  I stamped the acorn images from Thanks is for Giving or Acorn Elements in brown ink around the edge of the canvas.  I colored in the edges using a gold leafing pen.  I painted some of the blue paint over the gold.  I then stamped in blue ink the double leaves from Leaves or Leaf.


I added dots of shine mist and star dust Stickles over the canvas.  I them dry overnight.

On a piece of white tissue paper I stamped the sentiment from Thankful in red and brown inks.  I attached the tissue paper inside the circle with multi-medium making sure to put some on the both the back and over it.  I stamped more of the double leaves from Leaves or Leaf in blue ink over the tissue paper.  In light grey ink I stamped the script from Text Melange or Text  in different places on the canvas.   Using a copic I colored in areas of the tissue paper and also outlined the word "thankful".


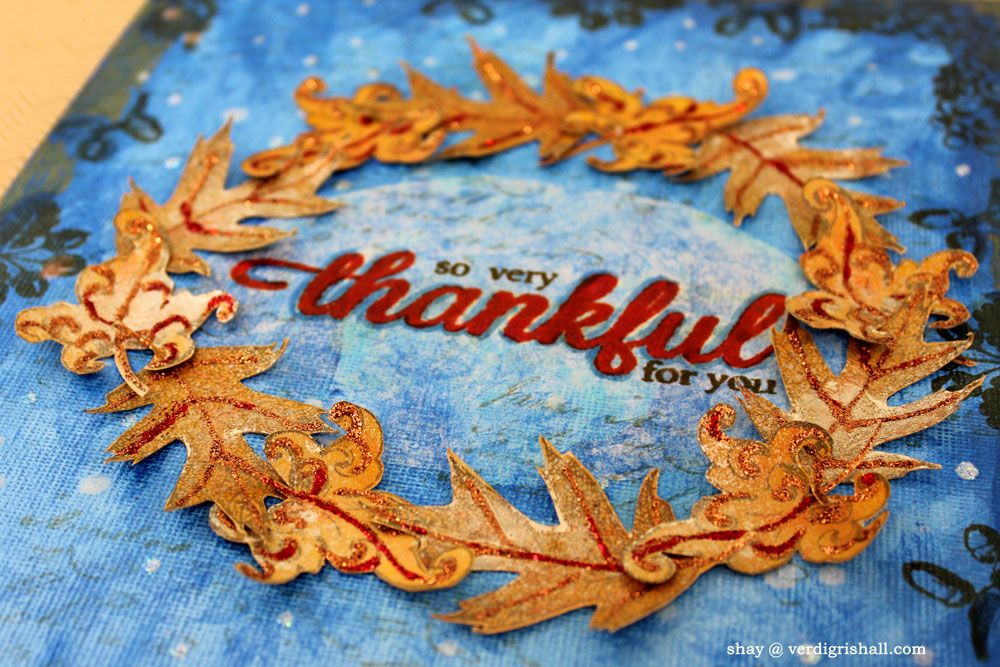
Following the line of the circle I adhered the leaves making sure to only put multi-medium in the center of the leaf.  I fluffed up the edges of the leaves to create dimension.


I think this would make a good hostess gift during the autumn season.  I chose a blue background to mimic the autumn sky and to allow the leaves to pop off the color, but you could easily change up the colors to make them work perfectly for the hostess' house.


That's it from me for this month's hop.  Make sure to head on over to our peerless leader Carrie's blog next!!

***Here is the complete line up just in case you get lost along the way***

Shay <==YOU ARE HERE

It has been a real pleasure to have you visit me today and I hope this hop inspires you to ink up some Paper Wings Productions stamps!

Happy creating,
Shay.

Supplies:
Stamps:


Ink: cornflower, cup o'joe, red royal and wet cement mid-tone, Hero Arts Shadow Ink
Cardstock: sand, Neenah Paper
Canvas: 8 x10 canvas panel, Artist's Loft
Paint: metallic blue pearl and metallic blue sapphire, Folk Art; multi-medium matte, Claudine Hellmuth Studio by Ranger
Other: butter cream, lemon, mango and tangerine gelatos, Faber-Castell; mint blue (B01) and manganese blue (B34), Copic; calico shine Mister Huey's Color Mists, Studio Calico; copper, star dust and xmas red Stickles, Ranger; gold leafing pen, Elmer's; white tissue paper

August 2, 2013

Paper Wings Productions' August Design Team Blog Hop


Howdy, Pardner!

Welcome to the “Vintage” Paper Wing Production's Design Team Blog Hop & Giveaway!  If you've arrived here from Norma Gomez's blog, then you're in the right place.  If you’re just stopping by for a visit, please CLICK HERE to start from the beginning.
 
This month we’re sharing beautiful vintage themed projects and some of our new designers are making their Paper Wing Productions debut...so make sure to give them a hearty and warm welcome.  I am sure they will wow us all with their vintage art! 

Now it's time to grab a nice tall glass of something cool and refreshing and prepare to be inspired!!  This month’s main prize is a gift certificate to the New Paper Wings Production’s online store.
 

For a chance to win, all you need to do is:
  • be a follower of the Paper Wings Productions blog, The Aviary
  • visit each of the participating designer's blogs and leave them some love. Then go back to The Aviary and leave a comment letting them you completed the hop. 
  • to increase your chances of winning, like the Paper Wings Productions' Facebook page and/or invite your friends to the hop. 
  • then just come back and let us know! Be sure to leave a separate comment for each of the additional entries. 

The winner will be announced on Tuesday, August 6, 2013 on The Aviary.

Now are you ready to see my spin on vintage?

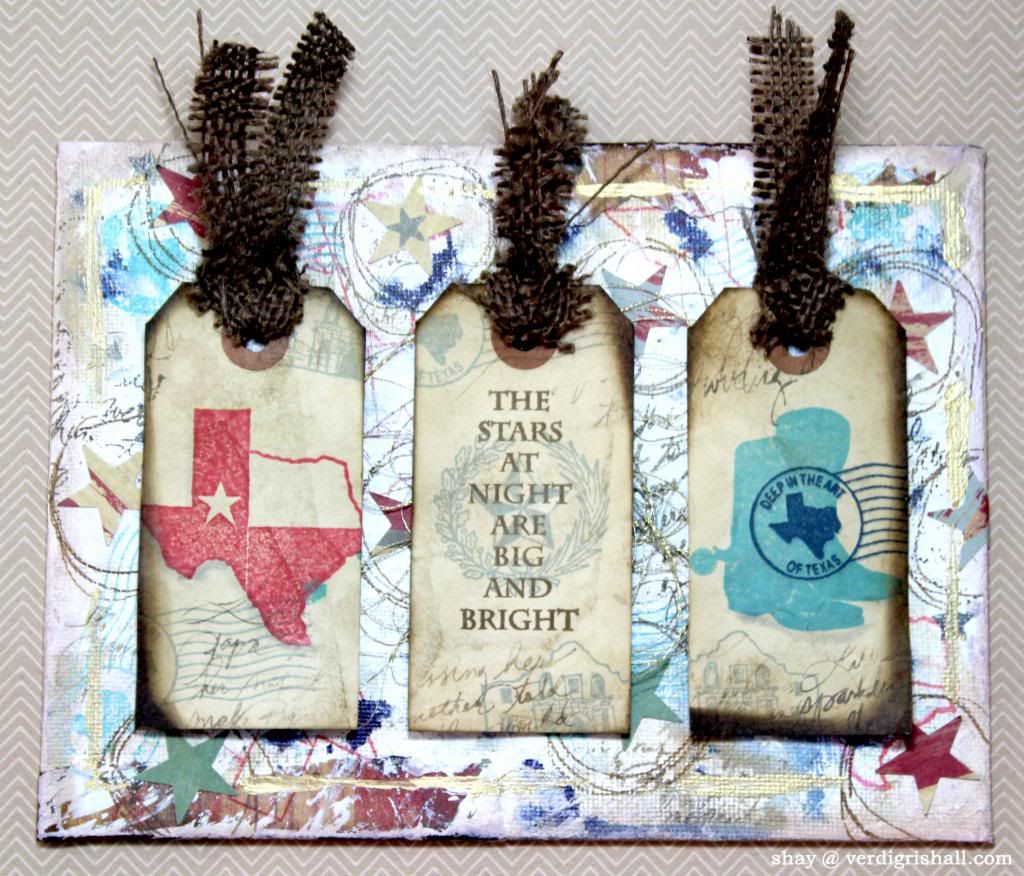
You sure?  It isn't what you would expect!  Because of all the Texas themed stamps available from Paper Wings Productions I went a little honky tonk and used the same format as last month with a tag art canvas.


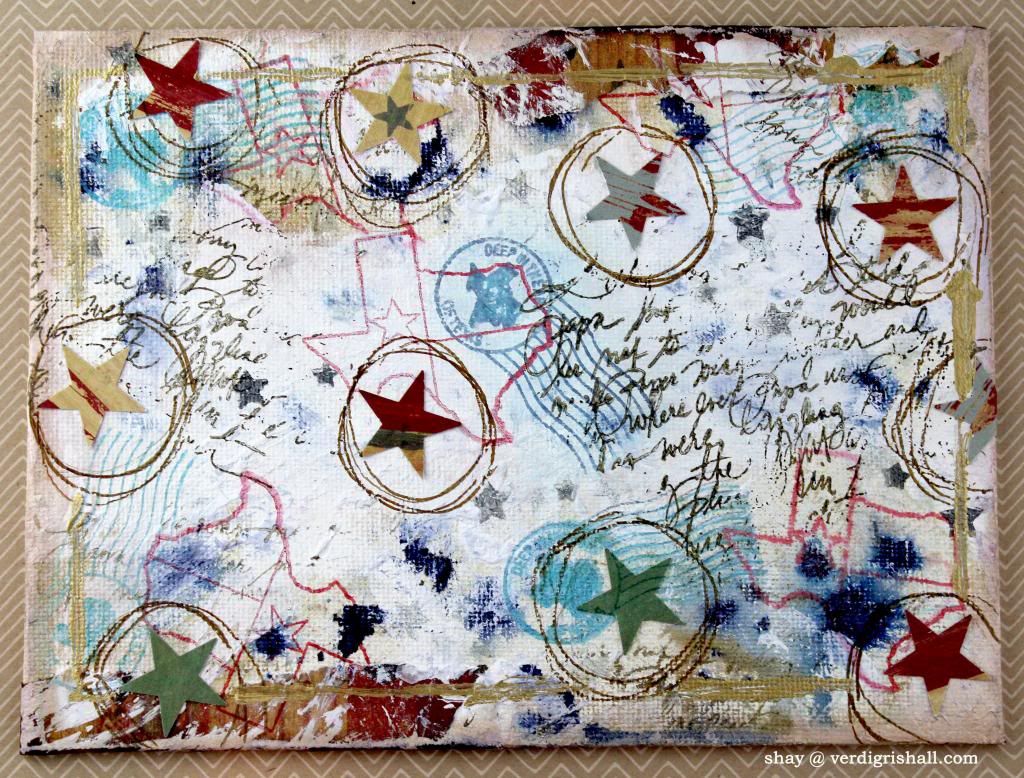
The background began innocently enough.  I started much like I did for my sea inspired piece from last month with some stamping, distressing of the edges and drips of mist.  Then I keep on adding distressing, images, color and a little bit of patterned paper.  Somehow it looked too dark so I added globs of gesso in a haphazard way with a strip of cardstock as an applicator.   Mist started to spread, I used a heat embossing gun to do some quick drying and added more gesso.  Then I scraped off gesso.  I added more stamping, ink, patterned paper stars and the like.  For the background I used Texas State or Deep in the Heart of Texas, Hanging Stars, Lone Star and Writing Backgrounds or Writing stamps.  I also added a border using a gold leafing pen.


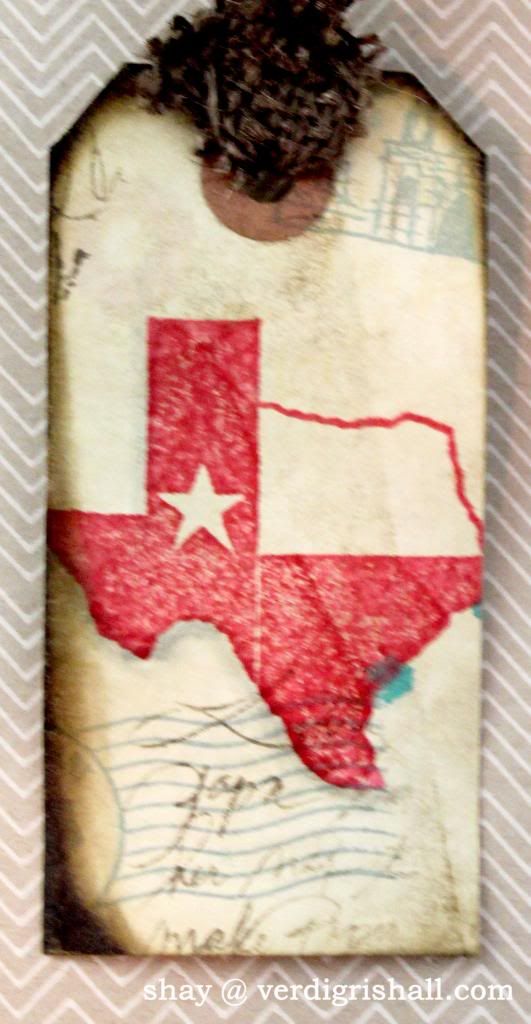
Tag No. 1


On a coffee stained tag I stamped the Texas from Texas State or Small Texas State using red and pink Distress Inks.  To add interest I stamped the Texas cancelation seal from Texas State or Deep in the Heart of Texas and the Alamo from Texas Melange or Remember the Alamo in grey ink and the writing from Writing Backgrounds or Writing in brown ink.  I tied a strip of brown burlap to the tag.

Tag No. 2


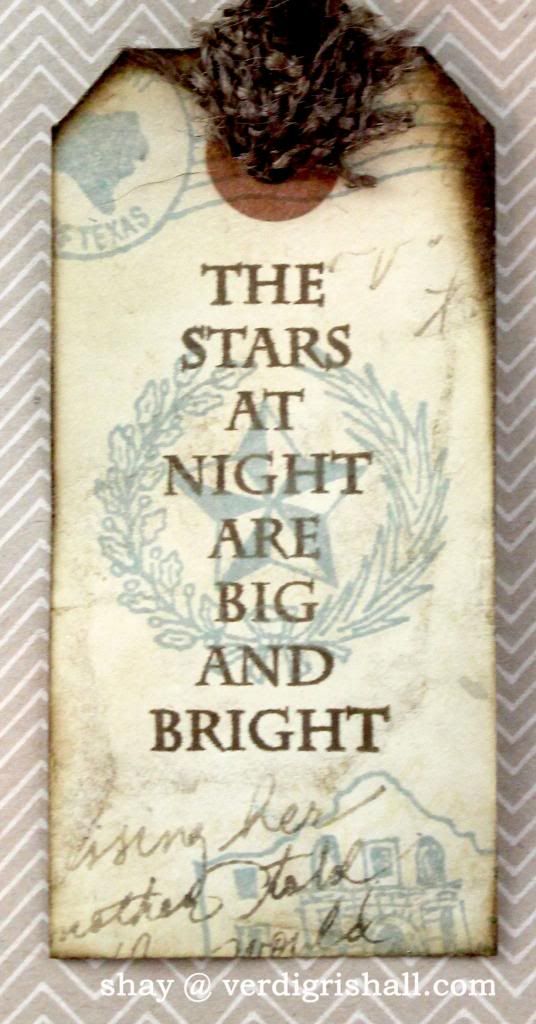
On a coffee stained tag I stamped the sentiment from Texas Sayings using brown ink.  To add interest in grey ink I stamped the star from Texas Melange or behind the sentiment, the Alamo from Texas Melange or Remember the Alamo also in grey ink and Texas cancelation seal from Texas State or Deep in the Heart of Texas and the writing from Writing Backgrounds or Writing in brown ink.  I tied a strip of brown burlap to the tag.

Tag No. 3


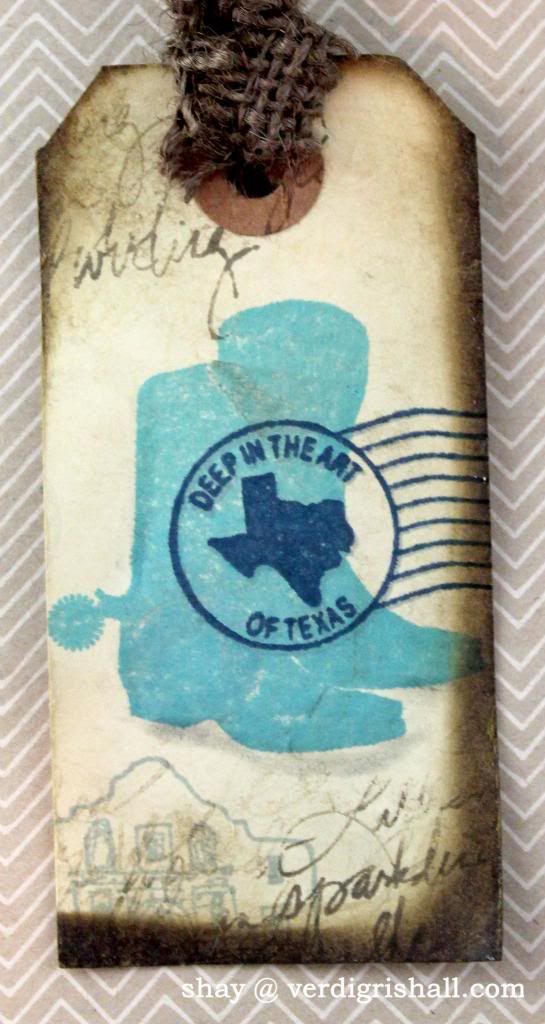
On a coffee stained tag I stamped the boots from Lyrics or Walking using blue Distress Inks.  Over the boots I stamped the Texas cancelation seal from Texas State or Deep in the Heart of Texas in dark blue.  To add interest in grey ink I stamped the Alamo from Texas Melange or Remember the Alamo and the writing from Writing Backgrounds or Writing in brown ink.  I tied a strip of brown burlap to the tag.


Behind the middle tag I added a nest of gold thread.  And there you have it!

***Here is the complete line up just in case you get lost along the way***

Shay <===== you are here

It has been an absolute pleasure to have you visit me today and I hope this hop inspires you to ink up some Paper Wings Productions stamps!

Happy creating,
Shay.

Supplies:
Stamps: Texas Sayings &


Ink: worn lipstick, fired brick, stormy sky, broken china and brushed corduroy, Tim Holtz Distress Ink by Ranger; weather vane, spice tin, malted milk and brown sugar, Jenni Bowlin for Ranger; cup o' joe mid-tone and charcoal mid-tone, Hero Arts Shadow Ink
Cardstock: solar white, Neenah paper
Patterned paper: kingman from halfway café collection, Cosmo Cricket
Other: canvas panel, artist's loft; gesso, Claudine Hellmuth Studio by Ranger; star punch, Stampin' Up!; Inkssentials ink blending tool, Ranger; heat embossing gun; twilight sprinklers, October Afternoon; antique brass glimmer mist, Tattered Angels; Cool Gray No. 3 (C3), Copic; chestnut memory marker, American Crafts; gold leafing pen, Elmer's; gold thread, Coats

June 7, 2013

Paper Wings Productions' June Design Team Blog Hop


WELCOME to the “Summer Fun” Paper Wing Production's Design Team Blog Hop & Giveaway!  If you've arrived here from The Aviary, then you're in the right place.  If you’re just stopping by for a visit, I’d love for you to check out our hop...you will not be disappointed!  I am honored to be the first stop for this blog hop!

This month we’re sharing some “summer fun” themed projects.  So sit back, grab yourself something cold to drink or better yet some ice cream or frozen yogurt and enjoy a little Paper Wings Productions summer inspiration!  Oh and let’s not forget about the blog candy!!  This month we’re giving away a gift certificate to the Paper Wings Production’s online store AND there will be some blog candy along the way!!  
For a chance to win, all you need to do is:
  • be a follower of the Paper Wings Productions blog, The Aviary
  • visit each of the participating designer's blogs and leave them some love. Then go back to The Aviary and leave a comment letting them you completed the hop. 
  • to increase your chances of winning, like the Paper Wings Productions Facebook page and/or invite your friends to the hop. 
  • then just come back and let us know! Be sure to leave a separate comment for each of the additional entries. 
The winner will be announced on Tuesday, June 11th, 2013 on The Aviary.

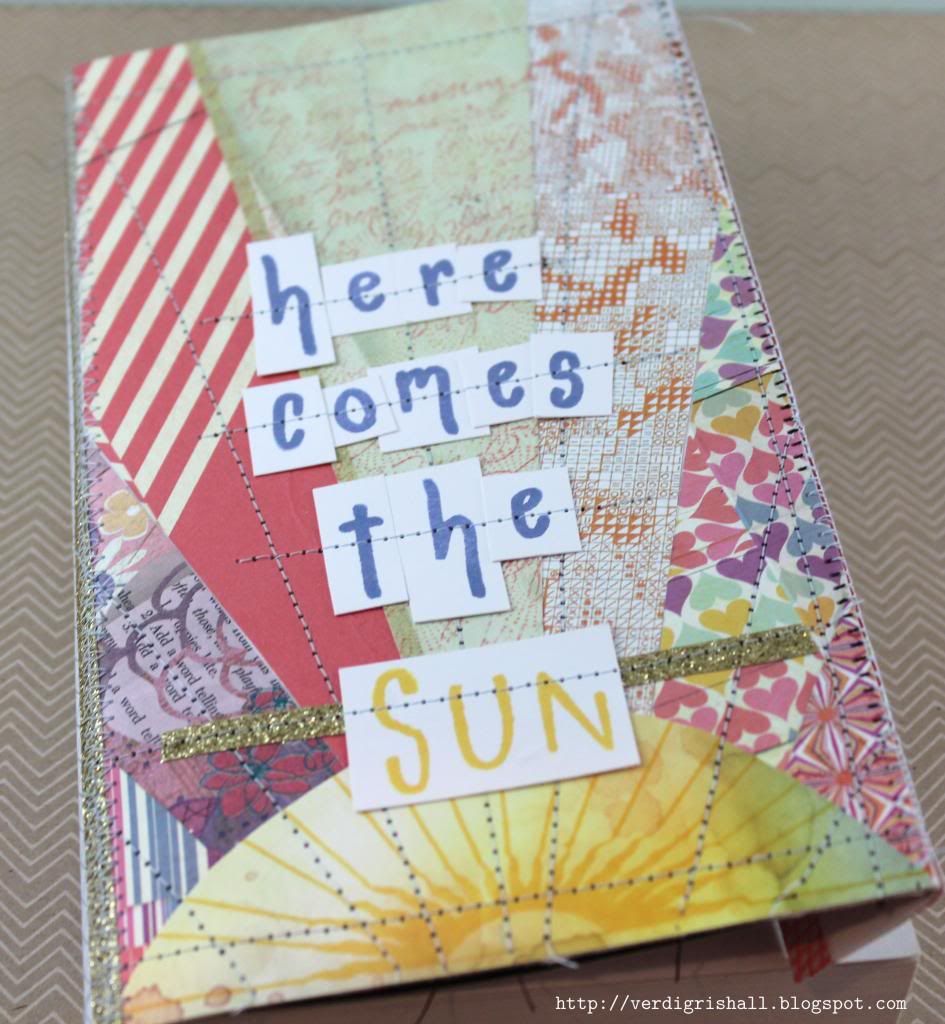
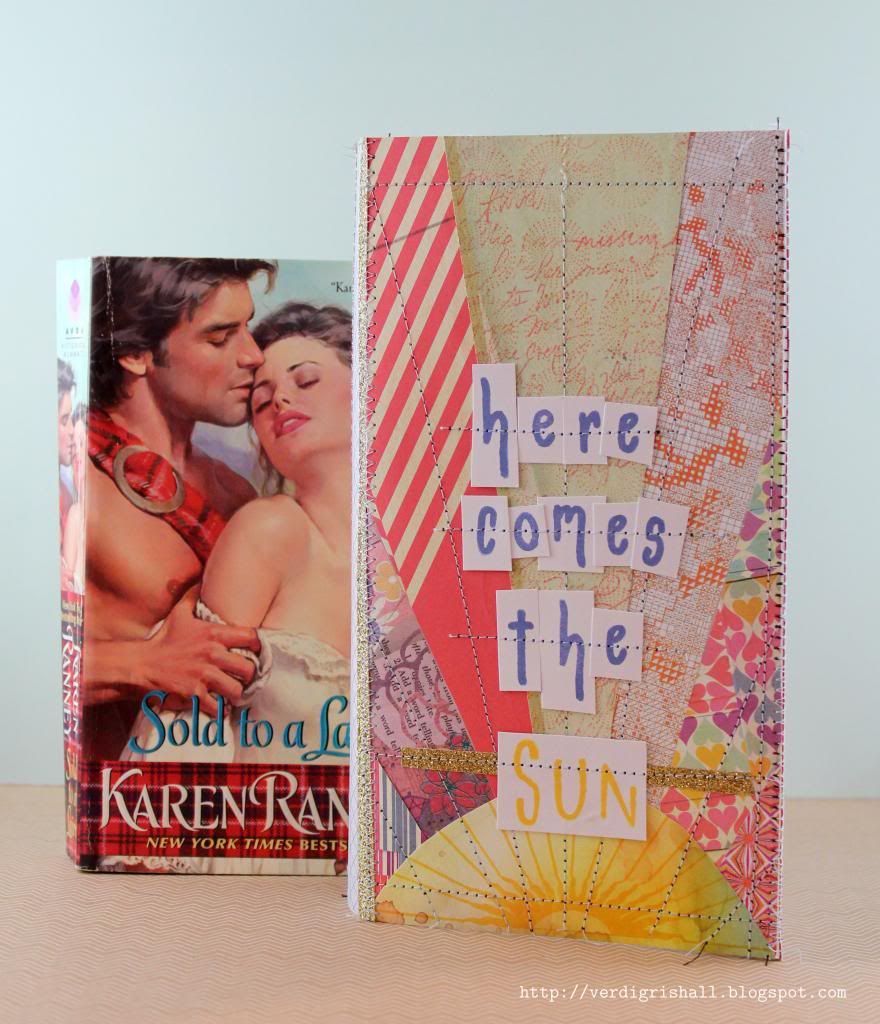
When I was brainstorming ideas for Summer Fun, I hit upon one of my favorite ways to spend hours upon hours: reading.  I thought why not create a book cover to disguise those steamy paperbacks that are so much fun to read?  I know there are ebooks, but sometimes a good old fashioned book is just the thing poolside, on the beach, in a car, on the plane or sitting in the cool air conditioning.  


I started with Claudine Hellmuth's 8.5" x 11" sticky-back canvas thinking I would do some image transferring.  In the end though I used the sticky-back canvas like a big fabric sticker.

Here is what I did (big surprise this is pretty wordy):

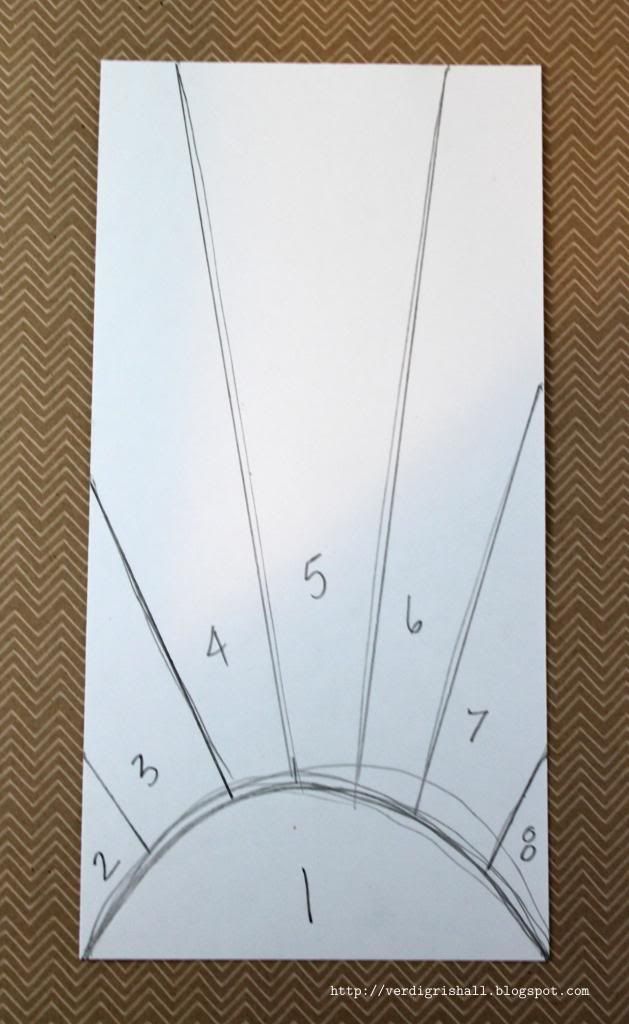
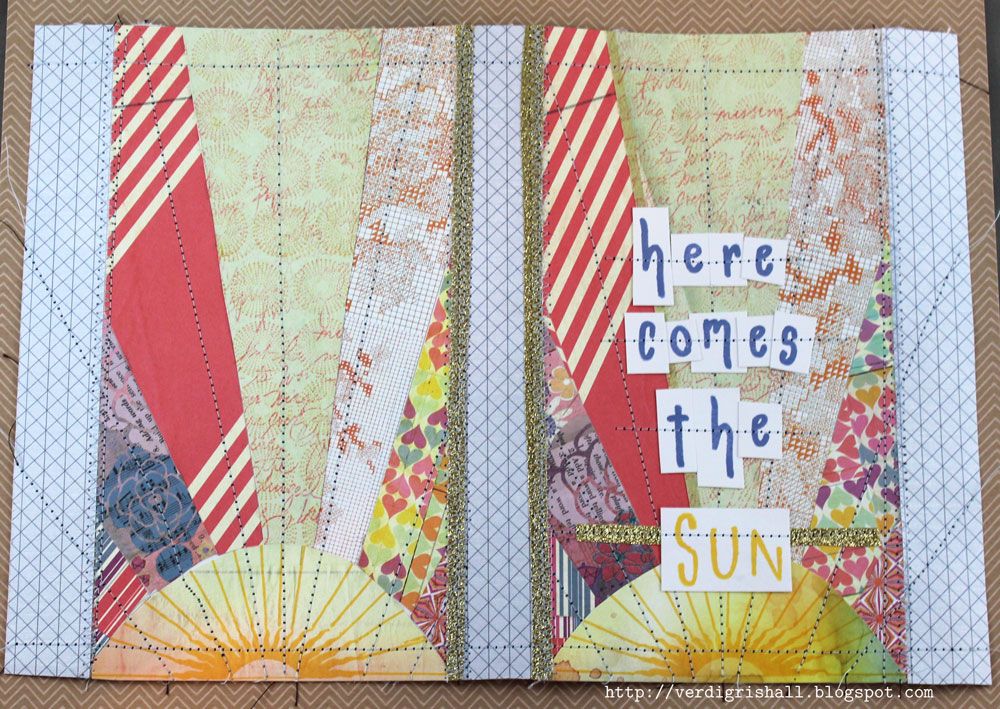
I freehand drew a sun ray pattern on a cardstock panel which measured 8.5 inches high by 4.25 inches wide (in the end the project ended up being 8 inches high as I didn't need as much height).  I numbered each of the parts and then cut them out (I cut each shape out twice as I made two panels for the front and back).  I used those pieces as patterns to trace onto pieces of patterned paper from the Basic Grey|Sassafras Soleil collection.  


I stamped the sun from Earth and Sky or Sunrise and a line from Window using yellow ink onto the half circle shape.  The largest center ray piece I stamped over with the Backgrounds or Circles background and Writing Backgrounds or Writing stamps.  I adhered (using some liquid glue) each sun and its ray to a piece of cardstock measuring 8.5 x 4.25 inches using the numbers from the pattern pieces as guides.  Don't worry if things aren't perfect because you are looking for a handmade mismatched look anyway.    

On the piece of sticky back canvas, I measured 0.5 inches on each of the right and left sides to be folded over as flaps to fold into the book to keep the book cover over the book.  I actually cut two one inch wide strips from patterned paper for these sections.  I measured for center and decided to create an inch wide spine that I then cut out from patterned paper.  Removing the backing to the sticky-back canvas and with the sticky side up, I placed the center strip at 5 inches (it will then take up the place of 5 inches to 6 inches on the canvas).  The panel I wanted as the front cover I placed on the right side butting up next to the center/spine 1 inch strip of patterned paper. I placed a one inch strip to the right side of the front panel.  Next I placed the back panel to the left of the center strip and finished off by adding the last one inch strip to the left of the back panel.  I lined up the panels to the bottom of the sticky-back canvas as any cutting I would be doing would be to the top of the canvas.  Happy with the placement, I used a bone folder to burnish the paper onto the canvas.  I cut any overhang of paper from the canvas and added some strips of brown sugar glitter tape on the spine for more interest. 

Then I actually got out the sewing machine.  This should garner a response of shock and awe as the sewing machine and I have a very peppered past.  Anyone aware of my sewing abilities knows I have a much better relationship with the seam ripper.  I want to assure you that I was very pleasantly surprised by how easy it was to sew on this project. If I can do it, ANYONE can do it!  I went to town sewing all over the canvas.  Have fun trying different color thread, different stitches, free style stitching as this is the perfect type of project to play with the sewing machine or if you are able and willing hand stitching.  


Next I stamped "here comes the" from Funky Lower Case Alphabet with blue/purple ink on white cardstock.  I cut out each letter as little blocks not worrying about size or straight lines.  Then I stamped "sun" using Funky Alphabet (the uppercase version) in yellow ink and cut out the entire word as one block.  I used a little liquid glue to adhere each letter to the front panel.  I placed a strip of brown sugar glitter tape down under the sun block.  I then sewed across each word.


At this point you can add more stamping, sewing, painting, doodling, embellishments or not.  When you are happy with it, I recommend for more durability painting on a few layers of modge podge or soft gel medium to seal the piece. 


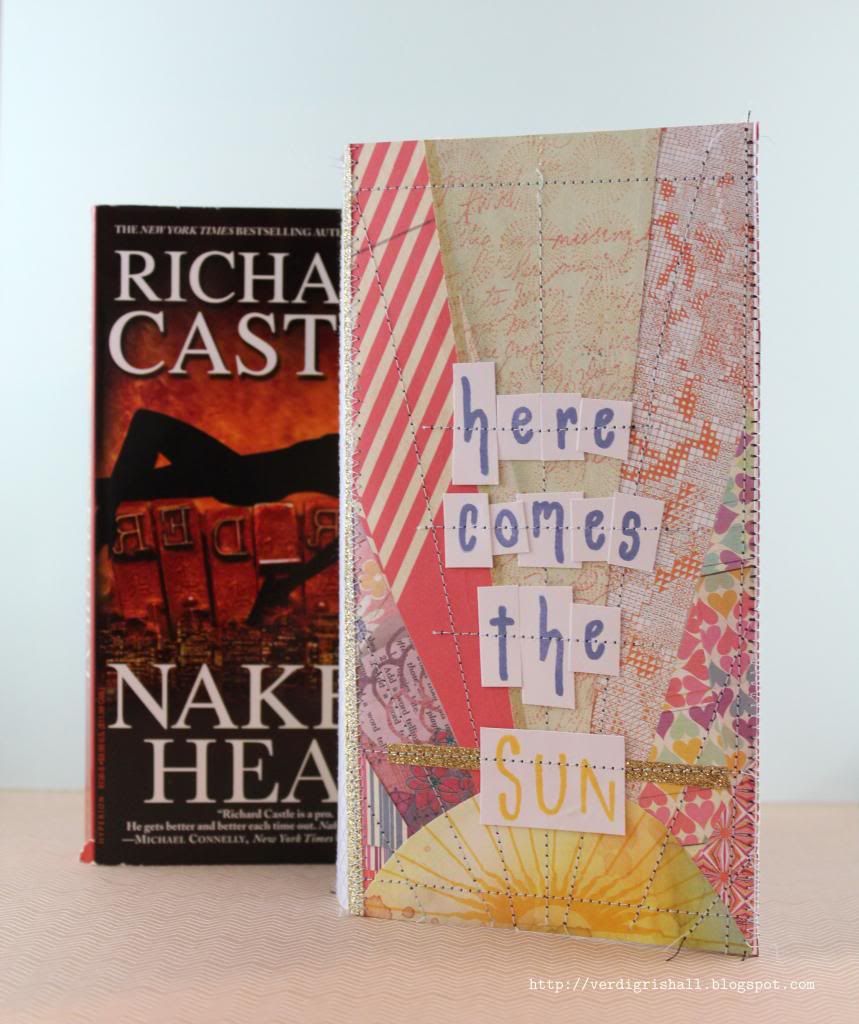
This book cover will fit those odd long paperbacks or a paperback of around 350 pages.  I think that if you used a 12x12 inch piece of sticky-back canvas or used more than one 8.5 x 11 inch sheet you could make a wider book cover for thicker books or even one that fit trade paperbacks and/or hardcover books.  This would be fun to make again and the possibilities are endless on how you could decorate it! 


Now you can hide that guilty pleasure of a book (Fabio-like men hidden from prying eyes) behind your artsy book cover or give one to a friend with a book or books and/or gift card as a considerate gift.  If you try out this idea, please let know because I would *love* to see it!

Now, make sure you check out each and every stop on the hop starting with the very talented lady that makes all things Paper Wings Productions possible, Carrie Avery.

***Here is the complete line up just in case you get lost along the way***

It has been an absolute delight to have you visit me today and I hope this helps kick start an amazingly creative and fun summer!

Happy creating,
Shay.

Supplies:
Stamps:

Ink: squeezed lemonade, scattered straw, wild honey, dried marigold and worn lipstick, Tim Holtz Distress Ink by Ranger; butter bar and stone wash, Hero Arts Shadow Ink
Cardstock: stamper's select white, Papertrey Ink
Patterned Paper: 6x6 Soleil paper pad, summer daisy and mermaid from Soleil collection, Basic Grey
Other: sticky-back canvas, Claudine Hellmuth Studio by Ranger; sewing machine; brown sugar glitter tape, American Crafts; Quick-Dry Adhesive, Scotch


LinkWithin

Related Posts with Thumbnails