Showing posts with label nautical. Show all posts

July 5, 2013

Paper Wings Productions' July Design Team Blog Hop


Ahoy there!  Welcome to the “By The Sea” Paper Wing Productions' Design Team Blog Hop and Giveaway.  If you've arrived here from Dana's blog, then you're in the right place.  If you’re just stopping by for a visit, I’d love for you to check out our hop...you will love what you find.  Please CLICK HERE to start from the beginning.

This month we’re sharing enchanting projects from down “by the sea”.  So grab a tall cold drink with a colorful umbrella naturally and let’s go “by the sea.”  There will be blog candy along the way too so make sure you stop by each blog!  This month’s main prize is a gift certificate to the new Paper Wings Productions' online store.  

For a chance to win, all you need to do is:
  • be a follower of the Paper Wings Productions blog, The Aviary
  • visit each of the participating designer's blogs and leave them some love. Then go back to The Aviary and leave a comment letting them you completed the hop. 
  • to increase your chances of winning, like the Paper Wings Productions' Facebook page and/or invite your friends to the hop. 
  • then just come back and let us know! Be sure to leave a separate comment for each of the additional entries. 

The winner will be announced on Tuesday, July 9, 2013 on The Aviary.

Are you ready to see what I have in store for you by the sea?

It just so happens that I am in a nautical mood and luckily Paper Wings Productions has just the stamps I need to make a nautical inspired canvas panel.


I began the canvas by stamping the waves from Mermaid on the bottom right hand side of the canvas with grey ink.  Then I over stamped the postcard in blue ink from Writing Backgrounds or Postcard.  I also stamped the postcard on the top left of the canvas.  The last bit of stamping on the canvas was to add several shells and starfish from Sea Melange or Sea.  Lastly, I added some drops of mist and distressed the edges with Distress Ink.

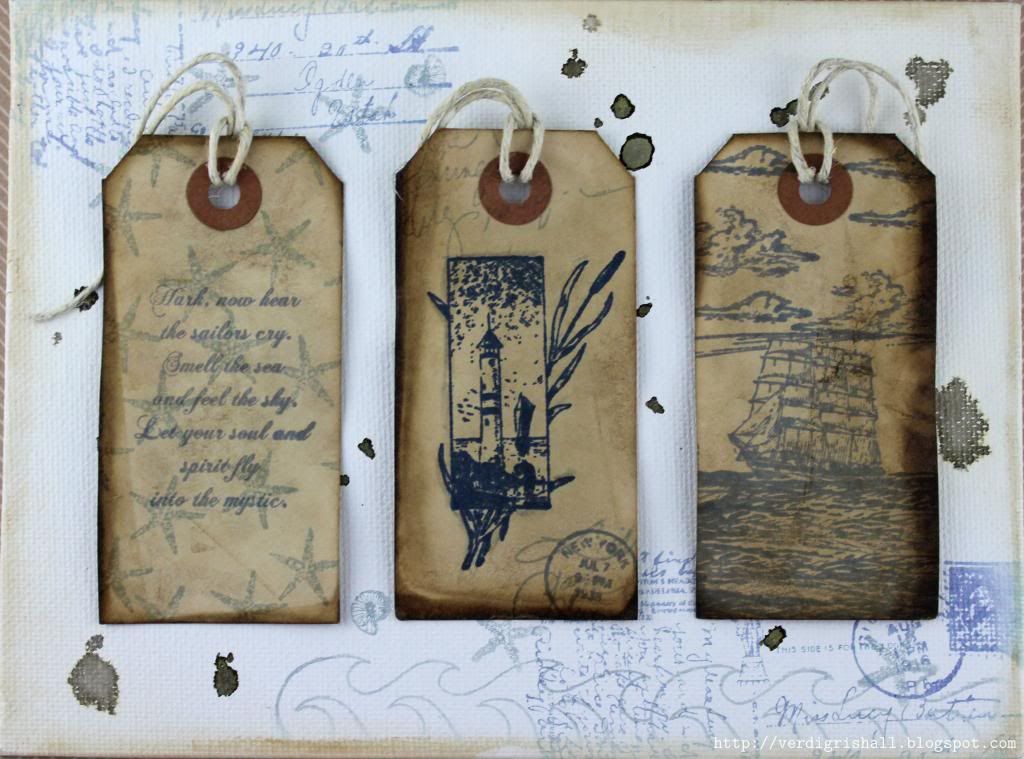
The finished background:
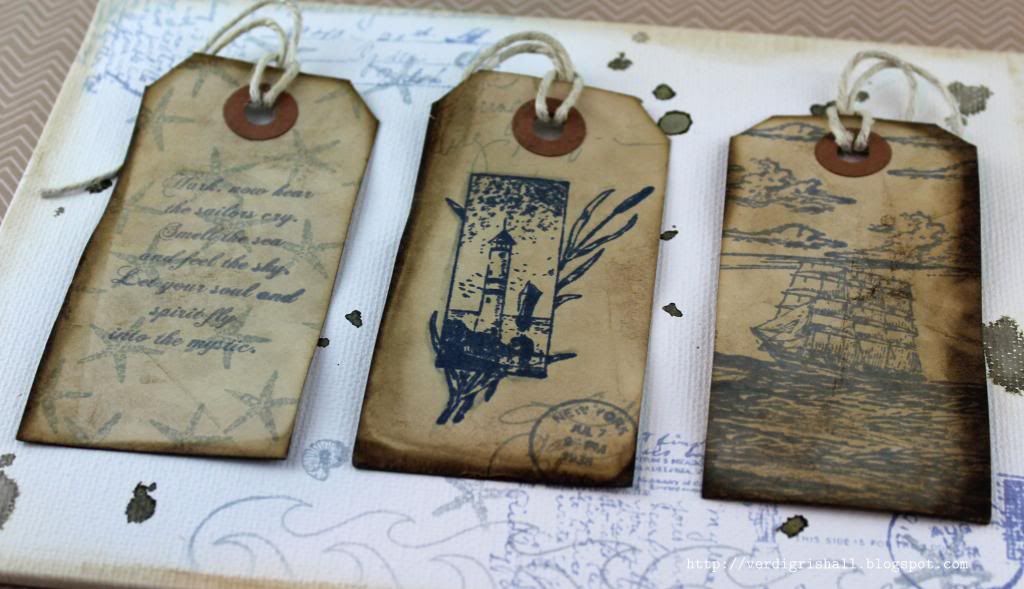

Left tag:


I stamped the starfish from Sea Melange or Sea in grey on to a coffee stained tag.  The quote from Sea Melange or Seaside was stamped in blue ink.

Center tag:


The lighthouse from Sea Melange or Seaside was stamped in navy on a coffee stained tag.  I added some depth to the image by using a Copic marker.   In blue ink I stamped the cancellation seal from Text Melange or Text on the bottom right.  I stamped part of the handwriting from Writing Backgrounds or Writing in grey over the seal and on the top left of the tag.

Right tag:


I stamped the ship scene from Sea Melange or Sea in blue on a coffee stained tag.  I stamped just the waves a few more times to fill in the bottom of the tag which turned out perfect!  I stamped the clouds from Earth & Sky Melange or Cloudy several times on the top of the tag in blue ink to finish off my scene.

And here is another look at the this seaworthy canvas:


I think this little baby is going to my papa as he also loves the nautical look.  I love when something I make can be given as a gift.  Win-win.

By the way if you want to see a couple of other by the sea projects I've made in the past for Paper Wings Productions click HERE (mermaid) and HERE (boat).  Make sure to also visit The Aviary for lots of other fabulous by the sea inspiration and much, much more!

That's it from me for now.  Make sure to head on over to finish up the hop at The Aviary.

Here is the complete line up just in case you get lost along the way:

Shay *you are here
The Aviary

It has been an absolute delight to have you visit me today and I hope this hop motivates you to ink up some Paper Wings Productions stamps!

Happy creating,
Shay.

Supplies:
Stamps:


Ink: antique linen and brushed corduroy, Tim Holtz Distress Ink by Ranger; weather vane, Jenni Bowlin for Ranger; navy and stone wash, Hero Arts Mid-Tone Shadow Ink
Other: canvas panel, Artist's Loft; coffee stained tags; Inkssentials ink blending tool, Ranger; token from midway collection sprinklers color mist, October Afternoon; hemp twine; cool gray no. 3 (C3), Copic; dimensional adhesive

July 2, 2013

Man Oh Man Monday No. 17 | Anchors Away


Happy July and hello there!  For today's Man Oh Man Monday I went nautical.  Perhaps I am too easily swayed, but I end up being a fan of most trends especially all things nautical.  Maybe I just have a weakness for peg legs, sea shanties and scurvy. 

I also printed up some more awesome journaling cards by Emily Merritt Designs.  This time around the Ahoy kit.


I picked out the anchor card.  From the one anchor journaling card I was able to create two cards simply by cutting out the anchor.  For the first card I used the negative section of the journaling card and the anchor which I cut out on the second card.

As we are nearing July 4th I decided to pair the blue with some snappy red and white diagonal striped paper.

Card No. 1


Card No. 2


I hope you have a delightful 4th of July and come back Friday for a sea worthy adventure with Paper Wings Productions' design team.

Happy creating,
Shay.

Supplies:
Digital kit: Ahoy, Emily Merritt Designs
Stamps: neat things, Hello Forever for Studio Calico (from the Spencer's Project Life Kit) and XOXO stamp set from Planetarium Card Kit, Studio Calico
Ink: charcoal and navy mid-tone shadow ink, Hero Arts
Cardstock: stamper's select and kraft, Papertrey Ink
Patterned paper: stationary noted 6x6 paper pad, Teresa Collins
Other: Tide embossing folders, Lifestyle Crafts; Cuttlebug, Provo Craft; star sequins, stash; silver mini brads, stash; opaque gems, Studio Calico; brown sugar glitter tape, American Crafts; craft knife, Martha Stewart Crafts; dimensional adhesive

March 18, 2013

Man Oh Man Monday No. 2

Good Monday and ahoy mateys! This week I bring you a clear based card with a touch of a nautical feel.   I was inspired to make a clear card by Papertrey Ink's Make It Monday #107: Clear Card & Copic Coloring Basics


I would say this card is Easy Going.

As I don't have any clear cardstock (something that I need to add to my already eye-popping long to-buy list) I used some of the backing that stamps come on that I have collected over the years.  I cleaned the backing with a old t-shirt to get any unsightly film off them. 

For this project I wanted to use my Background Basics: Herringbone.  I love this set, but found the large image a challenge to stamp with good results.  Perhaps I am merely stamping challenged, but if you also find yourself in this undesirable situation I can help by suggesting doing this:
  1. stamp into a foam pad or mouse pad; 
  2. apply some force with your fingers onto the acrylic mount or stamp press enough so that the ink actually sticks to the paper;
  3. carefully flip over the acrylic block with the paper still stuck to the stamped image
  4. place a piece of scratch typing paper over the cardstock being stamped upon
  5. either use your fingers, brayer or a smaller acrylic block to evenly press all over the cardstock and stamp through the typing paper. 
Using this method I then got a clean stamped image instead of an image with gaping holes.


The little sailboats are from Bitty Baby Blessings which I stamped three times on a white piece of cardstock with black ink and then colored in with Copics.  I wanted a little interest on the sails so added stripes using the Colorless Blender and edging it with the darker blue for them to stand out in contrast.  The sentiment is also from Bitty Baby Blessings, but I decided not to include "little sailor".  Somehow a smidgen of the ink from the "little sailor" part of the sentiment transferred although I swear I carefully wiped it all away.  So that is why there are those three brown gems under "ahoy". 

The herringbone panel is adhered on the opposite side of the clear card front with the sailboat panel adhered to the top of the cart front.  A word of caution, take your time placing your panels down as once adhered they won't budge without damage thus why the cardstock panels on my card list (pun intended) to one side.  The card front and back are adhered with a simple strip of gold washi.


I think this card could be given to a baby, boy or someone older with an interest in the sea and thus why I left out the "little sailor" of the sentiment.  Also, this card could be used for various occasions depending on what sentiment was put inside (my inside is a simple red piece of cardstock).

Challenges Met: Papertrey Ink's Make It Monday #107: Clear Card & Copic Coloring Basics.

MOMM Tips:

MOMM Tip No. 1: Clearly fun.  Try using acrylic cardstock or clear packing material to make a card.  It is fun to play with the transparent aspect of acylic.
MOMM Tip No. 2: Don't fret mistakes.  If you fumble a bit try to find a creative solution before tossing it and starting over.  I covered up my mess up with a gem and like the card more for it and only I know the reason I added the embellishment.
MOMM Tip No. 3: Use your background stamps.  Those stamps are marvelous for gender neutral designs that you can ink up in any color you want to match your project.
MOMM Tip No. 4: Modify your stamps as needed.  There is no rule that you have to ink up the whole sentiment/image of your stamp.  Ink up whatever part works for you.

And there you have it.  I am firmly behind the nautical trend and you will probably see this theme appear in future Mondays (wait until I go anchor crazy!).  Are you on board for all things nautical or rather see them walk the plank? 

If you would like to play along leave a comment with a link to your creation(s). I am so excited to see whatever you make. Also, if you have any suggestions for products, inspiration, themes, colors, etc. please don't hesitate to leave me a comment.

Happy creating,
Shay.

Supplies:
Stamps: Bitty Baby Blessings and Background Basics: Herringbone: Papertrey Ink
Ink: pale tomato mid-tone shadow ink, Hero Arts; tuxedo black, Memento by Tsukineko
Cardstock: stamper's select white and pure poppy, Papertrey Ink
Other: acrylic; colorless blender (0); prawn (R24), cadmium red (R27), light grayish cobalt (B95), night blue (B97), sepia (E37), dull ivory (E43): Copic; gems, Studio Calico; gold washi

LinkWithin

Related Posts with Thumbnails